

Designers are not always experts. More often, we are in a process of continual learning (just like you). When I designed the Chunky Rainbow Pullover (free pattern), I was had to learn how to work an intarsia join. I was quite apprehensive, but it turns out this technique is VERY easy, and now I have a new ‘trick’ in my repertoire! This tutorial will teach you to make a basic intarsia join.
How to work a Very Basic Intarsia Join:
The only thing you have to do to work an intarsia join is to lay the ‘old’ yarn over the ‘new’ yarn when changing from MC (Main Colour) to CC (Contrast Colour). That’s all there is to it. This twists the yarns around each other, binding the work into a continuous piece of fabric! Lets take a look at it up close:
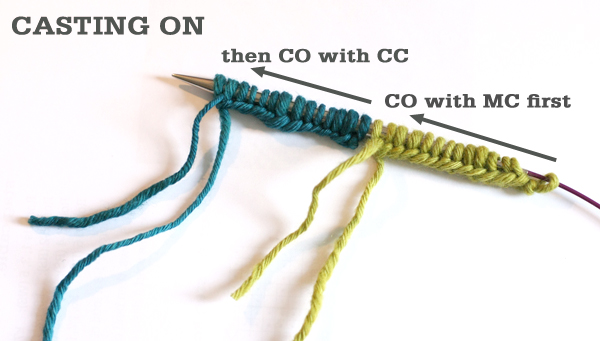
When casting on with 2 colours, simple cast on with the first, then cast on with the second.
When you are working the join on the right side (RS) or knit side of the work, begin by knitting to the colour change point as usual.

When you get to the colour change, lay the ‘old’ yarn over top of the ‘new’ yarn. Then grab the ‘new’ yarn, and knit across to the end of the row as usual. It is as simple as that!

On the wrong side (WS) or purl side, you do EXACTLY the same thing – but it looks a little bit different, as you are purling rather than knitting. Lay the ‘old’ yarn over the ‘new’ yarn, then proceed to purl to the end of the row as usual.


Voila – this is what your work will look like – with a perfectly invisible join when viewed from the RS / knit side of the work.

Or when viewed from the WS / purl side of the work, it looks like this. You will notice a neat little vertical ‘twist’ detail at the join on this side of the work.


That is all I have learned so far about intarsia – just the most basic join. I hope you aren’t too shocked and disappointed that I don’t have the skills to work exquisite intarsia patterns like those favoured by the inimitable Kaffe Fassett. Sad but true. Luckily (if you are lucky) life is long, and there will be another day to learn to make this:

Want to learn more? Check out our full range of in-depth tutorials, or get in touch to let us know what you’d like to learn next! You can find us on Facebook, Instagram, Twitter, Pinterest or Ravelry!
![]()
![]()
![]()
![]()
![]()
![]()
Did you enjoy this Tutorial? Get our email updates to hear about our patterns and tutorials as they are launched!
Lovers of colour will also enjoy:


Well that’s not scary: Knitting Intarsia – The Woolly Badger
September 29, 2020 @ 5:44 am
[…] big holes appearing between each patch of colour, and keeps your work one lovely bit of material. Tin Can Knits have a great blog showing you how to do this twisty join, which I should’ve looked at before […]
October 10, 2016 @ 9:41 pm
I’m wondering if you can achieve the same clean change of color with a ribbed stitch or if there is a trick to making that work. I’d appreciate any feedback or advice. Thank you!
October 11, 2016 @ 9:46 am
Hi Lisa – There is no reason it couldn’t work with ribbing, it would just be a question of tension over the change from knit to purl.
Grand MacAlpine Stole | Wayfaring Yarns
October 10, 2016 @ 3:30 pm
[…] Need help with intarsia? Here’s a great tutorial for beginners and those who need a little refresher. https://blog.tincanknits.com/2013/01/29/intarsia/ […]
April 27, 2016 @ 8:46 am
Hi This is very helpful, but as I am not a great knitter found it hard to understand as I want t cast on in Main colour for the 1st row, on 2nd row knit 20 MC then join in Contrast k20 then join in Main colour and knit 20..do I have 2 lots of Main colour yarn? thank you
April 29, 2016 @ 9:37 am
Hi Lynne – nope, just 1, the ball should be attached where you left it so you can just pick it back up again
August 16, 2014 @ 8:48 am
Thanks, for the help. I have a pattern that I was stumped by, having never done color block before.
May 4, 2014 @ 12:37 am
Whenever possible, weave the yarn tail into the back of an area of the same color. This will prevent the weaving from showing through on the right side of the work. Because there will be so many ends to weave in, take a break from knitting every now and then as you work to weave in a few.
February 17, 2014 @ 7:13 pm
So it looks like the two color cast on is not joined until the next row of knitting, is that right?
February 18, 2014 @ 6:55 am
Judy – you’re right, on the cast-on row, the cast-on stitches in the first colour are not yet ‘joined’ to the cast-on stitches in the second colour. The join happens first on the first row of knitting (or purling).
July 26, 2013 @ 11:45 am
For those of us who have never attempted intarsia, this makes the complicated understandable!
January 31, 2013 @ 9:09 am
Guess what? The basic join is just about all there is to intarsia (okay, and weaving in ends, but I bet you can do that just fine). Design something as amazing as that coat and try it out!
January 30, 2013 @ 8:51 am
Great tutorial! I have yet to make something using intarsia, but I’m sure I will at some point. It looks a lot less intimidating now.
July 24, 2020 @ 11:20 pm
What a simple explenation. Even I got that and I am a novice knitter. Thank you.