
This post is part of a multi-part series that covers the Strange Brew colourwork yoke sweater recipe! To get the Strange Brew recipe pattern (it’s written for 3 gauges, and includes 25 sizes from baby through women’s and men’s 4XL) click here.
This colourwork tutorial series will cover:
We’ve broken the colourwork sweater tutorial into 10 parts. Start at the beginning and work your way through – or just jump to the technique you need help with!
- Introduction
- How to choose your size: find the right size for you.
- Choosing yarn for colourwork: which yarns work best in colourwork.
- Swatching for colourwork: a few different ways to swatch specifically for colourwork.
- Developing your custom sweater concept: where to place that colourwork
- Gauge in a yoke sweater: understanding where it matters
- Using the FREE Anthology pattern: a great way to try out your concepts
- Applying colour to stranded motifs: time to experiment!
- How to design a Strange Brew yoke: using our Strange Brew recipe to turn your inspiration into a woolly work of art!
- How to plan a steek in a Strange Brew sweater: prefer a cardigan? Learn how to plan a steek.
And many other topics too! There will also be posts highlighting some great sweaters that were designed using the Strange Brew sweater recipe pattern.
Ready to design your own custom colourwork sweater? It’s so exciting! The first thing to consider is where to place your patterning?
Patterning: here, there, or everywhere?
While the Strange Brew pattern was conceived as a recipe for a colourwork yoke sweater, the truth is that it’s possible to place colourwork patterning at any point on your garment! Cuffs and hems, across the chest, just a stripe of colourwork in the yoke….so many possibilities! So where will you add patterns?

Patterning at the Yoke
Within the round yoke of a Strange Brew sweater, there is a certain amount of room to locate motifs. Following the pattern there are a total number of rounds that you need to work to reach sufficient depth (this will depend on your size, and on the gauge at which you’re knitting).

One convenient feature of the Strange Brew recipe pattern is that the pattern sections (A, B, C or 1, 2, 3) have stitch counts divisible by 24. This means that colourwork motifs with stitch repeats of 2, 3, 4, 6, 8, 12, and 24 will all fit evenly, with no stitch count adjustment being required.
Full Depth Colourwork Yoke

If you develop a colourwork pattern that fills up all of the yoke rounds, you’ll get a deep yoke, like that of Almanac. If you take the pattern even further, and extend the colourwork onto the body and sleeves, you will get an effect like that of Marshland.


Pattern Centered in Yoke Depth

An elegant and simple option is to locate a narrower band of colourwork in the middle of the yoke. To create a design like this, take your total number of yoke rounds, and divide these rounds into roughly three sections. The bottom section will be worked in MC. Work your chosen stitch pattern (or patterns) in the middle section. The top section will be worked in MC, with all of the 2/3 (or 3/4) shaping rounds spaced above the colourwork and one below (or perhaps you might prefer all of the increases above the colourwork).

Icefall features a pattern roughly centred within the yoke depth. 
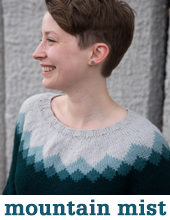
Mountain Mist’s pattern transitions from light to dark but is also placed roughly at the midpoint of yoke depth. 
Bodhi’s Snowflake sweater also has a centrally placed motif with shaping placed above the colourwork.
Narrow pattern band at neckline

Working a narrower band of colourwork within the top third to half of the of the yoke is a nice option too. This can often look a little bit more delicate than a full-yoke depth pattern.

The concept I am developing for my own #strangebrewKAL sweater design will likely fall into this category of yoke design, with a narrowish band located at the top of the yoke.

Cuff and Hem Patterns
No need to let your sweater yoke have all the fun! Add some colourful details to the cuff and hems of your beautiful creation. The Strange Brew sweater recipe body stitch counts are all 12-stitch multiples. That means that many of the stitch patterns included in our little library with the pattern will fit evenly at the hem, without any stitch count adjustment.

If you’re knitting your sweater bottom-up, work your ribbing, knit a couple of rounds, then add a colourwork pattern. Your best bet is to add simple patterns related to the stitch patterns used in the yoke section. Working from the top down you will need to take the depth of your desired motif and ribbing into account when determining how long to knit the body before you start your colourwork.

The stitch counts of the sleeve cuffs are 4-stitch multiples. This means that 2-stitch and 4-stitch motifs will fit evenly. To work a motif of a different stitch repeat, you can either adjust the cast on stitch count, or work edge stitches at start and end of the pattern so it fits.

Colourwork All Over
If you’re going ALL the way, we applaud you! All-over colourwork is intensely fun to knit. Alexa made MANY versions of the all-over design which developed into Cartography. One critical thing to note about all-over colourwork is that the stranded colourwork doesn’t create the same stretchy fabric that stockinette does. So you’ll want to choose a size with some positive ease or you may find the sweater feels too small. The same size won’t fit in the same WAY as a sweater made in stockinette.

The Cartography sweater 
A prototype sweater in all-over colourwork 
A wild rainbow colourwork version; this one required a little more planning!
If you’re planning to go ‘all in’ then you probably want to do some extensive swatching, so that you can calculate your round gauge after blocking in the yarns and patterns you’ve selected. That way you can calculate PRECISELY how many rounds you will have to work with on your body and sleeves.
If you’re knitting and designing an all-over garment ‘by the seat of your pants’ then you may find it easiest to work from the top down (it leaves a bit more room to adjust if things aren’t working perfectly), but really, either way will work!
Colourwork as a band on the body

Whenever colourwork is placed on the body of the sweater, it becomes critical that your stockinette and colourwork gauges match. If they don’t match you can get an ‘hourglass’ effect, where the silhouette pulls in at the colourwork section.

This is not ideal! To match your colourwork gauge to your stockinette gauge, you may try going up a needle size or two, and holding the work inside out when working the body tube so that the floats will tend to be slightly longer and looser. Our suggestion would be to do whatever you need to in order to LOOSEN UP, and so that you draw those yarns not in use (the floats) very loosely across the back of the work, and you avoid condensing the fabric too much. You can find all of our tips and tricks on colourwork here.
Blocking will also help, after the fact, however it won’t solve a really major gauge difference, so so take care in the gauge testing phase.
Colourwork at Cuffs and Hem only

Lastly, it’s not required that you place ANY colourwork at the yoke. You could knit your sweater with some stripes or colour changes, or simple stockinette at the yoke, and keep the colourwork to just the cuffs and hem.
Further Design Considerations
Some other issues to consider as you develop your sweater concept:
- Do you want to adjust the body or sleeve lengths those given in the pattern?
- Will you include waist shaping?
- Do you want to adjust body shaping?
- Do you want to include short-row shaping, and if so how will it interact with your desired pattern placement?
- Do you want to make a cardigan (this means planning a steek)?
We will touch on each of these topics in coming posts!
My #strangebrewKAL Concept
My concept for my #strangebrewKAL sweater is to work my sweater bottom up. I will be working a fairly large-repeat wedge pattern (about 24 sts wide) that transitions from the deep red that I’ve chosen for the body, to a lighter contrast colour. I also plan to make the body cropped and boxy, with a high-low split hem detail… I’ll be posting more design details as I develop them on the Ravelry Group #strangebrewKAL thread, and in our Instagram Stories!
More colourwork from Tin Can Knits:


October 25, 2018 @ 12:51 pm
I am wondering how you would add a turtle neck neckline to these sweaters?
October 25, 2018 @ 1:42 pm
Bottom-up is pretty simple, just keep working your ribbing (maybe decrease a few extra sts at the neckline), Top-down I would do a provisional cast on and pick up and knit the turtleneck last.
October 25, 2018 @ 10:03 am
Trying to purchase Strange Brew hard cover book! Sold out everywhere – perhaps a second printing? lol!
October 25, 2018 @ 1:42 pm
Hi Misty – not to worry, they should be back in stock shortly, we still have books!