
If you have always wanted to try lace, but have been a bit too intimidated, now is the perfect moment, and we have an ideal pattern for you!
Grab your yarn, needles, and a copy of Gothic Lace, our free beginner lace pattern! You can find all the project details (and more pretty pictures) in this post.
 We made the Gothic Lace cowl in a worsted / aran weight yarn (Malabrigo Worsted) using 5mm needles, so it is a quick knit and easy on the eyes and the fingers.
Once you are comfortable with lace techniques, you can graduate to skinnier yarns and littler needles! Use a solid or semi-solid colour yarn, because the lace pattern can get lost in variegated yarns.

Getting Started :::
 Following the Gothic Lace pattern, you can knit either a short cowl (wraps once around), a long cowl (wraps twice around), or a scarf.
For a cowl, cast on 49 stitches, and for a scarf cast on 41 stitches. If you just want to make a little lace practice swatch just cast on 25 or 33 stitches.
To begin, you will knit 8 rows (this forms the garter stitch edge).

Next it is time to start the lace pattern! The instructions say:
Repeat rows 1-12 of gothic lace pattern, following chart or written instructions…
As you can see, the lace section of the pattern is described by a lace chart, and also by line-by-line text instructions. You can follow either the chart or the text instructions, or flip back and forth from one to the other!
Don’t understand charts? We have an in-depth tutorial to help you learn how!

When you are working a lace pattern, it is very important to read all of the abbreviations and chart notes carefully before you begin the pattern, so that you understand the chart. In this pattern, you will learn that the chart shows right side (odd numbered) rows only. All wrong side (even numbered rows) are worked as follows: k3, purl to last 3 sts, k3. Easy Peasy Lemon Squeezy.
So you will start with row 1, following the chart or the text instructions:
Row 1 (RS): k2, k2tog, yo, k1, [ssk, k1, yo, k1, yo, k1, k2tog, k1] repeat to last 4 sts, yo, ssk, k2
If this is your first lace project, there may be some instructions that you haven’t come across before. Click the links to find out exactly how to work these stitches if they are new to you.
How to work common lace stitches :::
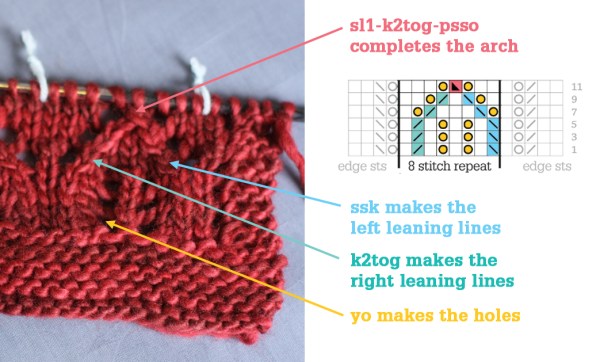
Lace is formed by increases (typically yarn overs to form the holes) balanced by decrease stitches. Some of the most common stitches used are:
- k2tog – knit 2 stitches together – is a right leaning single decrease [tutorial here]
- ssk – slip, slip, knit – slip 1 knitwise, slip 1 knitwise, knit 2 slipped sts together through back loops – is a left leaning single decrease [tutorial here]
- yo – yarn over – starting with yarn in back of work, bring yarn between needle tips from back to front, and then pass over RH needle to back of work, creating a new loop over the needle – this is a single increase which creates a hole in the work [tutorial here]
- sl1-k2tog-psso – slip 1, knit 2 sts together, pass slipped stitch over the k2tog and off needles – this is a left leaning double decrease [tutorial here]
To make your first lace experience easier, place markers at the start and end of each pattern repeat. The pattern repeats are indicated by the heavy vertical lines in the chart, and the square brackets [ ] in the text instructions. So as you work row one, have 5-6 stitch markers ready to place on the needle in between stitch repeats.
For absolute clarity, let’s work row 1 together…
Row 1 (RS): k2, k2tog, yo, k1, [ssk, k1, yo, k1, yo, k1, k2tog, k1] repeat to last 4 sts, yo, ssk, k2

You start by knitting 2 stitches, then working k2tog, then a yo, and one knit stitch. These are the ‘edge stitches’. Place a marker (PM) now, then work the lace repeat once [ssk, k1, yo, k1, yo, k1, k2tog, k1], then PM again to mark the end of that 8-stitch repeat. You will still have 36 more stitches on the left-hand needle to work (or 28 if you are making the scarf). So what do you do? Well, a ‘repeat’ is called a repeat because you repeat it… So work that same 8 stitches [ssk, k1, yo, k1, yo, k1, k2tog, k1] 4 (or 3) more times, placing a marker after each repeat, until you get to the last 4 stitches of the row (no more repeats will fit). Then you end the row with the ‘edge stitches’ on the other side, yo, ssk, k2.
Your very first lace row is complete, and you have markers that indicate the start and end of each repeat, which make for easy checking. Before you work the wrong side (WS) row, check that you have the correct number of stitches in each section; from right to left you should have 5 edge sts, then 4 or 5 sections with 8 sts each, then 4 edge sts, with your stitch count being the same as you cast on (49 sts for a cowl, 41 sts for the scarf). This lace pattern maintains the same stitch count on all rows, because the number of sts increased (by yos) equals the number of stitches decreased by (k2togs, ssks, and sl1-k2tog-pssos).
After you have worked row 1, you will work row 2, which is given in the text instructions, and described in the chart notes, but not shown on the chart itself.
Row 2 and all following WS rows: k3, purl to last 3 sts, k3
The k3 at start and end of the WS rows create a garter stitch edge, which is a nice detail, because garter stitch doesn’t curl the way stockinette stitch does.
When you have finished row 2, you will look again to the chart or text instructions for working row 3. As you will notice, rows 1, 3, and 5 are all exactly the same! So you will get a lot of practice with this identical sequence of stitches.
As you work the lace, keep the markers in place (just slip them from the LH to the RH needle in between working the stitches). Check after each RS row to ensure that you have the correct number of stitches in each section (5 edge sts, 8 sts per repeat section, 4 edge sts at end). That way, if you make a mistake it is very easy to locate, and work back to fix it right away.

Rows 7, 9, and 11 are each unique, but keep the markers in place in the same locations, and simply work the combination of stitches indicated. You will notice how the lace pattern as knit looks just like the lace pattern illustrated on the chart.
This is one of the great benefits of working from a chart; you quickly learn to see how the knit fabric should look, and are much less likely to make mistakes in your knitting, because the structure of the pattern will ‘make sense’.

Once you complete row 12, you are ready to start again at the beginning of the lace pattern. So go back to row 1, and start there. As the pattern states:
Repeat rows 1-12 of gothic lace pattern, following chart A or written instructions, until piece measures approximately 22 (44) inches for short (long) cowl, or 58 inches for scarf.
After that many repeats of the pattern, you will be a lace expert!

All that remains is a bit of finishing. If you’re making a scarf or a cowl without buttons, just knit 8 rows (removing markers), and bind off all stitches.

If you are making a buttoned cowl, you have a couple of options. You can work regular buttonholes within the garter stitch band:
… work buttonholes: k3, [yo, k2tog, k4] 7 times, yo, k2tog, k2
OR you can make crocheted button loops, as I have done in my sample (note: crochet abbreviations are American).
How to work crochet button loops :::
Using crochet hook and yarn, begin with WS of work facing, working into the bind-off row.
Foundation row (WS): Work sl-st into first 2 sts, [ch4, skip 3 bind off sts, sl-st into next 3 bind off sts, ch4, skip 3 bind off sts, sl-st into next 2 bind off sts] repeat 3 more times, sl-st to end. This forms 8 button loops.
Next row (RS): work sc to button loop, [sc 5 times into button loop, sc once] repeat 7 more times, sc to end.


Voila! You have a completed cowl or scarf! After you weave in all yarn ends, and sew buttons on, you are ready for the last very important step: blocking.

Wet blocking is very important for lace, because it opens up the pattern, and sets the stitches. You’ll see what I mean when you block your first lace piece. We will share an in-depth tutorial on blocking lace in coming weeks, but for now, just follow these simple instructions:
HOW TO WET BLOCK ::: To wet block, soak your knit in lukewarm water, then lay it out on a towel, roll up and stomp on the towel to squeeze out as much water as possible. Finally lay out flat (pinning along edges if desired) until completely dry.
Learn more about blocking regular knit projects here. These instructions will work just fine for this cowl or scarf.

LEARN LACE with a friend :::
Do you have friends who would like to try lace? Share this post, or let them know about the great free patterns they could try from The Simple Collection. And join in the conversation on Facebook, Instagram, Twitter, Pinterest and Ravelry!
![]()
![]()
![]()
![]()
![]()
![]()
Other patterns to perfect your lace skills:


April 22, 2021 @ 5:33 pm
This looks good I think I can knit the gothic knit cowl.
March 1, 2021 @ 1:32 am
I’ve finished a gothic lace scarf, my first lace and I gave myself an added challenge of using a fine slightly fluffy yarn that I bought on a whim last year when I began my knitting journey. Thank you so much for the expert guidance, such clear instructions gave me the confidence to knit lace and it turned out beautifully. Definitely going to knit another in a thicker yarn and I’ve just bought the Lush cardigan and Love Note patterns :)
March 20, 2020 @ 5:45 pm
Hello. I live in Eugene Oregon and working on this pattern. Finding periodically I have to rip a line or two !! But now I don’t know what line I I am on so I cannot proceed. Help!!!
We would have been in Edinburgh in April to visit St Andrews but flight and travel canceled
Is there a way if I take a picture of where I am you can tell me what line I am on?
Frustrated. I really love this pattern snd yarn
Julie Beck
March 20, 2020 @ 5:47 pm
I am working on Gothic Lace
Forgot to tell you this
September 25, 2018 @ 6:41 pm
I’m currently doing “Prairie Fire”a lace pattern pullover by Tin Can Knits.
I’ve done the 18 rows and do have the 21 chart stitchs. But I’m not sure how to carry on. Rows 19-24 are continuous, with an 8 stitch repeat in the centre.
The first stitch of row 19, says knit 3 togeather. As the lace grows I am including the two stitchs ahead of the stitch block, but it seems to create a hole. Not a smooth increase like the picture in the pattern. Also I’m unsure if After I finish line 24, would I do the 8 stitch repeat twice… I’m nervous as if I get a stitch or so over the pattern won’t work out. I’ll keep playing with it and hopefully the light will go on, but maybe someone knows this pattern and could advise me. Thanks in advance. JoAnne
September 27, 2018 @ 9:35 am
For the first stitch of round 19 in the lace chart you are going to knit 3 together, the first stitch of the lace with 2 sts from the surrounding stockinette. The k3tog shouldn’t create a hole though, are you sure you are working that stitch correctly?
May 31, 2018 @ 12:58 pm
I love your pattern and great instructions. I can’t wait to start. Just one thing I don’t understand. Instructions say:
“Following the Gothic Lace pattern, you can knit either a short cowl (wraps once around), a long cowl (wraps twice around), or a scarf.
For a cowl, cast on 49 stitches, and for a scarf cast on 41 stitches.”
I want to make the long cowl (wraps twice around) but I only see one number of stitches for cowl (49) is that for long or short?
June 2, 2018 @ 7:08 am
Hi Jennifer – the cowl is knit lengthwise and joined, so the height of the cowl is determined by the number of cast on sts, but the length (long or short) is determined by the number of repeats.
March 31, 2017 @ 3:35 pm
This is great! Thank you so Much!
March 25, 2017 @ 6:20 am
My goodness! These instructions are fantastic. Thank you so much for this.
January 14, 2017 @ 1:31 pm
Using a circular needle for this project would ýou knit back and forth, or straight around? If around, how would you treat the stitches? Thanks
January 16, 2017 @ 11:28 am
Hi Stephanie – the Gothic Lace cowl is knit back and forth, not in the round.
January 13, 2017 @ 5:33 pm
I have wanted to learn to knit lace for many, many years. I am so very thankful for your wondérful instructions. They were so clear and easy to understand. I made a four repeat cowl for my granddaughter and I’m starting a scarf with two extra repeats because I’m using a finer yarn. Whēn I was making the cowl I ripped completely four or five times. Once was after over a foot was complete. The design is beautiful. Thank you ver much.
April 28, 2016 @ 6:01 am
Wonderful tutorial. Quite complete and easy to follow. I immediately shared with a friend who is wanting to learn lace…
April 14, 2016 @ 7:03 am
Can I knit this cowl as a complete circle without the buttons? Would I have to change any of the pattern, such as increasing the number of stiches?
April 15, 2016 @ 10:21 am
Hi Beverly – to make the Gothic lace cowl without the buttons you could just sew the ends together when you are done and skip the crochet buttonholes, or you could use a provisional cast on and graft the ends together when it was complete.
April 17, 2016 @ 10:36 pm
Thanks for the information. I really want to try knitting lace on a small scale project. I like the idea of a provisional cast on and grafting, which I haven’t tried before, so here’s the opportunity. If I can’t get the yarn suggested in the pattern, in general what can I substitute, and how many yards would I need for the pattern?
April 18, 2016 @ 12:05 pm
All that info is in the pattern ;-)
December 7, 2015 @ 2:00 pm
Lovely pattern! Thanks for the button loop technique..I intend to use it on all of the buttoned scarves I knit. Buttons really add to the ways it can be worn!
July 21, 2014 @ 3:56 pm
http://tashaknits.blogspot.com/2014/01/janury-estonian-lace-shawl-pattern.html
Is this chart correct ? When I follow it, it gets increasingly crooked.
What am I missing
July 22, 2014 @ 10:46 pm
It’s hard to say without seeing your knitting or having worked the pattern myself. It looks like it should work…
December 10, 2015 @ 11:29 am
Thank you for the wonderful introduction to lace. Now, if only you would do a tutorial on how to rip back/repair when you notice your stitch count is off…..I can find such tutorials for stockinette, rib, and garter on you tube but I missed some yo’s on one row about 16 inches into your gothic lace pattern and now I need to rip back to correct matters but I am having a hard time figuring out how to put a needle/line through the right live stitches in a lace pattern to make the save….should I work the saving line or needle in from the purl side? or the right side? Should I have added the missing yo’s from the purl side to even up my count and moved on from there?
I started to go back stitch by stitch but that did not work well for me; and now I need to frog back a little further than I did before. I don’t want to lose all my inches of OK knitting so how can I work my way out of this problem? Also, would you recommend I start setting a life line at the beginning of each pattern repeat, every 12 lines/rows?
Your lace pattern tutorials would really be complemented with an example of how to mess up then fix up this lace pattern, I think, because alas, some of us do those things even on simple patterns; and we do want to learn how to fix things but may lack the patience/optimism/time before Christmas or whatever, to make a completely new start on an admittedly very good pattern when we recognize we have, for whatever fleeting reason, goofed up two thirds of the way through the project.
Thanks for everything, Mira Schoening, Seattle ajaxschoening@gmail.com
December 10, 2015 @ 1:56 pm
Hi Mira – thanks for your helpful notes! It is hard to make tutorials about fixing mistakes in knitting because there are so many small mistakes that are easy to make. They tend to be on a bit of a ‘case by case’ basis.
The only way I am personally able to rip back lace is to use a life line (very helpful) or to rip back to the row before the mistake. When I rip back I make sure to put the sts back on the needles one at a time for the last row. As soon as the yarn leaves the stitch it goes right on my needle. One concern there is twisting the stitch but I find that is easily remedied on the next row by either working the stitch through the back loop (therefore ‘untwisting’ it) or by simply taking the st off the needle and re-placing it the correct way.