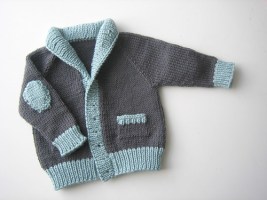
Knitting a baby sweater is the perfect way to learn all the sweater techniques that would be necessary to knit an adult sweater, in a fraction of the time, and with a hopelessly adorable result! Our recently published Gramps cardigan is a perfect example, for while it is a relatively simple design, its simplicity requires a good number of intermediate knitting techniques.
Follow along as you knit your Gramps, and you will learn about:
- how to read a knitting pattern schematic
- how to do a provisional cast on
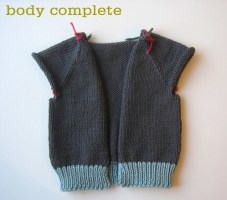
- how a top-down raglan is shaped
- pattern reading
- picking up stitches along an edge and in the middle of the fabric
- short row shaping
- buttonholes
- weaving in ends
The tutorial split into 6 blog posts – start with #1 and work your way through!


Learning to knit a sweater is very rewarding, and you’ll get to do it quickly and relatively painlessly if you follow along and knit the Gramps with me! ~ Emily
PS if you liked this, be sure to sign up to keep in touch, and we’ll let you know when new tutorials are ready!
October 22, 2022 @ 11:22 am
Attempting to begin knitting the Gramps sweater in size 2-4 for my grandson; having trouble understanding the M1 part, so you knit to 1 st before the marker, the M1R K1, slip Marker K1 M1L. And so on? I thought I was definitely an intermediate knitter and would easily understand the directions but I’m stumped.
October 23, 2022 @ 11:30 pm
Hello – the M1 means make one stitch. We have a tutorial here: https://blog.tincanknits.com/2013/10/03/m1/
So yes, as you’ve described, you’ll be increasing on either side of each marker, by working:
make one stitch (M1)
then knit one stitch
then slip the marker from left hand to right hand needle, so it stays in the same place between the stitches
then knit one stitch
make one more stitch (M1)
… then continue knitting to 1 stitch before the next marker.
You can work ‘paired increases’ where you do a m1R then and m1L if you like, or you can simply always use the same m1… it doesn’t really matter!
Hope this clarifies! ~ Emily
April 27, 2022 @ 5:08 pm
Hi.. I’m having difficulty understanding the SHORT ROW COLLAR SHAPING… After ribbing 2 stitches past 4th marker twice , this is where I get lost…the next RS and WS rows are confusing… there are only 2 stitches before marker and 3 stitches before GAP.. is that correct?.. Help
May 2, 2022 @ 10:49 am
Hi – The best way for us to do pattern support is via email, could you drop us an email at tincanknits@gmail.com? Thanks!
Avoiding the Sweater Curse: Knits that Fit the Entire Family – tin can knits
March 10, 2022 @ 2:11 pm
[…] try one of our sweater patterns that has a full tutorial to go with it! The Flax, Harvest, Gramps, Antler, and Love Note sweaters all have in-depth tutorials to help you each step of the […]
August 12, 2020 @ 4:40 pm
I love this jacket, am making it for our 4yo grandson, and plan to knit one for our daughter too. But….! I cannot get the wrap and turn tidy when I knit them into the band. I have no trouble with the short row 1&2, x6 3 stitches before the gap (setup rows A&B). The picking up the wrap and stitches just wont go neatly! I have undone and reknitted 3 times. And followed the wonderful tutorial but I am not happy with my work. Help! This is my first top down knitting experience and I love it – just as you said I would, Alexa! Antoinette From Tasmania
August 13, 2020 @ 1:54 pm
Hi Antoinette – Have you tried German short rows? I find some knitters like it better and have a better time with tension. We have a tutorial here: https://blog.tincanknits.com/2015/05/14/german-short-rows/
August 13, 2020 @ 3:02 pm
Thank you, Alexa. I am going to practice swatches of both the short row methods before I continue on the child’s gramps cardigan. The German one might suit my style better. I guess I could have done that first off! Let’s see how it goes. Thanks again for your amazing tutorials. And the patterns you offer! Antoinette
June 14, 2020 @ 12:21 am
How do i download the pattern?
June 15, 2020 @ 11:28 am
Hi – You can find the pattern here: http://tincanknits.com/pattern-9M-gramps.html
October 2, 2019 @ 9:48 am
Nope that is not what went sideways. I read the instructions “a total of 12 times (my size) to mean that I should include the set of instructions for the 4 rows as part of the total 12 times. Looks like I should not have included the instruction set. Wow – I am such a literal person.
October 2, 2019 @ 9:43 am
Gramps Sweater. I figured it out – I may have started my counter on the “place a marker” row which means I have to do one more set of the first 4 rows. Have not checked that yet but when I counted the stitches on each section I came out exactly 18 sts short. Am doing one more set of the first 4 rows to get 303 sts for size ML. Nice challenge.
October 1, 2019 @ 6:33 pm
I am doing the ML Gramps for myself and when I finished the first set of 4 rows I was 37 stitches short of where I should be – looks like I need to do 8 more rows to get 303 stitches. I am an experienced knitter so know that my work is ok – it looks like an error in the pattern. I am going to add 8 more rows just to make sure the armholes are large enough but am concerned. Curiously, the change in the number of stitches cast on for each size does not make sense. Sure hope my sweater comes out ok.
September 29, 2019 @ 11:34 am
Do you do all your ‘turning’ in one go & then pick up rest of stitches to finish rib normally?
September 30, 2019 @ 1:21 pm
Hi Angela – Yep, you work all the short rows, then pick up the wraps
August 25, 2019 @ 6:55 pm
Hi, do you know if I can knit this in cotton, or will it be too heavy? Thanks, it’s adorable.
August 25, 2019 @ 10:33 pm
Hi Sheila – cotton does behave differently than wool, and worsted weight cotton can be heavier, but I think it would be fine
January 21, 2019 @ 8:06 am
I’ve enjoyed knitting this pattern but am having a heck of a time with the set up of the shawl collar/button band. Are the second and third markers placed at the front raglan seam or the back seam? I appreciate any tips you might be able to give me. Thank you
Arra Sue
January 21, 2019 @ 10:57 am
Hi Arra – The first marker is at the end of the front neck shaping on the right side of the cardigan, the second marker is placed at the start of the back neck, the third marker is placed at the end of the back neck, and the 4th marker is at the end of the front neck shaping at the left side of the cardigan. Does that help?
January 4, 2019 @ 6:01 am
Where are the instructions?
January 8, 2019 @ 12:25 pm
Hi Ruth – you can find the Gramps pattern on our webiste here: http://tincanknits.com/pattern-9M-gramps.html
February 12, 2019 @ 7:58 am
To tin can knits
Can you tell me why this gramps pattern which I purchased in January cannot be downloaded ? It has been removed it says access denied. The same has happened to patterns I purchased a year ago. Do you know who does this?
I’m on gmail
Regards Ruth
February 13, 2019 @ 4:52 pm
Hi Ruth – sorry, I don’t know who does this, do you mean on Ravelry? Or from the email with download instructions? If you email us (tincanknits@gmail.com) we can sort it out.
September 23, 2018 @ 6:12 pm
Puedes mandarme el patron en español? Gracias.
July 29, 2018 @ 7:23 pm
I am working on the 0-6month size, when I get to the end of the increases the pattern says on the sleeves should have 32 sts, but I only have 30 sts. I have counted it several times
August 9, 2019 @ 1:30 pm
Consulta Ravelry. Muchas veces se encuentran patrones en espanol. Hay tambien muchas tejedores de habla hispana ahi. Muy buena suerte. -Brian
July 29, 2018 @ 7:21 pm
Working on the size 0-6 month when I get to the of the increases on the yoke. The sleeves are two stitches short. I get 30 sts.
July 30, 2018 @ 10:38 am
Once you have worked rows 1-4 a total of 6 times you work rows 1-2 two more times. That should give you 32
May 23, 2018 @ 2:07 pm
Please sign me up do that you could be sending me your tutorials, I am very interested
April 16, 2018 @ 6:34 am
Hi, I’ve just found your website and am looking for a first baby/toddler cardigan/sweater pattern – would you recommend starting with this one or the ‘Flax – Perfect first pullover’? Thank you! x
April 16, 2018 @ 1:17 pm
Hi Anna – I would say go for the Flax, it has a few less techniques to it, but Gramps makes a great number 2!
April 4, 2018 @ 12:49 pm
Love your gramps sweater pattern and yarn color combos. I am a bit intimidated to try this pattern. Is there a video knit-along or video tutorial?
April 5, 2018 @ 11:46 pm
Hi Amelia – sorry, just the photo tutorial
April 4, 2018 @ 12:32 pm
The catcha or gotcha portion of the sign-up process did not provide a send button option. It may get covered up by the red save/pin button at the bottom right of my phone screen. Please add me to your newsletter and video tutorials miling list. Please send links for your baby and adult sweaters and coatigans. Thank you so much. Any chance of doing sweater projects slowly from beginning to end? Please let me know or send links to your tutorials. I love the grandpa sweater and would also love to learn to make it along with a hoodie. I have not found your tutorial video for the grandpa sweater. Can you send it to me, please. Can you advise of a cardi and a hoodie knit-along video tutorial for eager beginners’ please? Also my mom would like me to knit or crochet a long vest and triangle shawl to take with her to the doctor. Can you recommend one of your video tutorials or tutorials done by someone else that you have found helpful, please? Thank you.
April 5, 2018 @ 11:46 pm
Hi Amelia – I think it’s best if you email us to get signed up for our email list. Then I will be sure to have all the right info.
February 12, 2018 @ 5:59 am
Thank you, I did just that😄
February 9, 2018 @ 1:37 pm
row1
it says m1 k2 m1 but I have only 1 knit left not 2
help!
February 10, 2018 @ 10:19 pm
Hi Doni – don’t worry, just slip the marker as you come to it: m1, k1, slip marker, k1, m1
January 26, 2018 @ 3:40 pm
I have the correct stitches 187 for three 18 st increases with a cast on of 33 BUT I have 17 stitches between the beginning and the first marker and 5 stitches between the last marker and the end.
The pattern didn’t say when to slip the marker so I did all increases in front of each marker.
Suggestions?
January 31, 2018 @ 11:33 pm
Always slip the markers as you come to them. I think you need to rip back
Craftfoxes » Super Cute Baby Sweater Knitting Patterns
November 18, 2017 @ 7:09 am
[…] Baby Grampa Cardigan This is my personal favorite of the baby sweater knitting patterns. As a fan of grampa cardigans for adults, seeing a mini-version of that is just too cute! And wouldn’t it be darling to see your little guy alongside his grampa, in matching cardigans? This is a simple knitting project and the tutorial in the original post is broken into six parts, so it’s easy to understand. You’ll need some worsted weight yarn in a main color and a contrasting color, a US #7 / 4.5mm needle, a US #6 / 4.0 mm needle, and 24” circular and double pointed needles in each size. There are sizes available for children up to 4 years of age. For the complete knitting pattern and tutorial, visit Tin Can Knits. […]
October 19, 2017 @ 1:40 am
Hi, I bought 9 Months on Ravelry and am wondering if I can make a (baby) bodywarmer from this cardigan, i.e. leaving out the sleeves and add some edging to it. Thank you!
October 19, 2017 @ 1:36 pm
Hi Elsje – that sounds totally do-able!
October 4, 2017 @ 8:32 pm
Having such a hard time with the shawl collar, I’ve done short-rows before and I’m a fairly decent knitter, but I don’t understand the RS and WS , I’ve tried it twice now and both times I end up on the RS when I should be on the WS on the second short row. I have no idea what I’m doing wrong. Help!
October 6, 2017 @ 12:30 pm
Hi Elizabeth – hmm, the WS is the inside of the sweater and the RS is the outside, could you maybe email us a pic and I could better diagnose the problem? tincanknits@gmail.com
September 19, 2017 @ 12:09 pm
Having a really hard time with these increase stitches.. knowing where to put them and whether it’s M1 left or M1 right. Started over 3 times now.
September 20, 2017 @ 11:50 am
Hi JoAnn – I use a m1L at the neck edge, a m1R before the marker, a m1L after the marker, and a m1R at the other neck edge. Does that help?
September 3, 2017 @ 2:55 pm
This is the most adorable pattern. I have two balls of Crazy Zauberball I’d like to turn into his sweater but it’s sock weight. Suggestions?
September 5, 2017 @ 12:29 pm
Hi Susan – hold it doubled! Do a swatch, but I would use a doubled sock yarn to knit this sweater for sure.
August 23, 2017 @ 4:40 am
Es un encanto,quisiera hacer uno a mi nieto tiene 7meses
July 27, 2017 @ 8:20 pm
Hello, do you have any tips on how to make the pattern in a larger size ty. I would love to knit one for my grandson who is 3 yrs 😊
August 2, 2017 @ 8:31 am
Hi Debbie- The Gramps pattern is sized from 0-6 months all the way to 4XL so it has all the sizes!
July 7, 2017 @ 4:38 am
Está hermoso me encantó
July 4, 2017 @ 10:02 pm
Hola Emily. Me encantó tu sweter. No sé cuantos puntos tiene cada parte. Cuantos el delanteto. Cuantos las mangas y la parte de atras. Cual seria el esquema. Espero tus noticias
March 9, 2017 @ 7:51 am
Hi there, where can I get hold of the pattern?
March 9, 2017 @ 10:54 pm
Hi Rhoda – on the Tin Can knits website or Ravelry
November 6, 2016 @ 6:16 am
Hi. I’m on the short row collar shaping. I have to work to 3 st before the gap then w & t. What is the gap ?
Thank you.
November 7, 2016 @ 10:01 am
Hi Marisa – the gap is right after the wrapped stitch
November 2, 2016 @ 5:01 pm
This tutorial for short rows is different than pattern instructions…set up row A..this tutorial says two stitches before last marker…the instructions are 2 stitches past last marker for size 2-4
October 22, 2016 @ 6:38 pm
Hi. I am doing the 1-2 year size. At the beginning where it says to work rows 1-4 a total of 7 times for the 1-2 year size that I should end up with 159 stitches but you won’t. You will end up with 177. You end up with 159 if you works rows 1-4 6 times. So should I do it six times and end up with 159 or 7 times which will change total number of stitches going forward. Thank you.
October 23, 2016 @ 12:35 am
Hi Marisa – so you start with 33 stitches, each repeat of rows 1-4 adds 18 sts so 18×7=126. 126+33 is 159. It all works, not to worry
September 16, 2016 @ 2:34 pm
Hola! !!me encanta éste modelo ya que tengo dos nietos de casi dos años, pero me gustaría que pusiera los puntos y los centimetros de cada parte del chaleco. Muchas gracias.
May 20, 2017 @ 9:10 am
I loved it
September 3, 2016 @ 5:50 am
Your tutorials on the Gramps cardi have been so helpful. Thank you for posting them. Great pattern, too, I can’t wait to see it on my son.
August 10, 2016 @ 8:29 am
Hello
When you say “after picking up, there should be an odd number of sts to each side of the back neck section” does that mean the right and left neckline??? I am having such a hard time understanding button band and shawl collar….feeling frustrated😞
Thank you so much for your help
Cheryl
August 10, 2016 @ 8:41 am
Hi Cheryl – that means the right front and right neckline together should be odd, and the left front and left neckline together should be odd.
July 23, 2016 @ 2:45 pm
Do you have a pattern to crochet this?
Thanks!
July 27, 2016 @ 12:17 pm
Nope, just knitting for the Gramps!
May 19, 2016 @ 6:35 pm
Are the sleeves part of the fronts or the back neck. where do you put the 5 markers? Do you only increase stitches on the back neck or also on the sleeve stitches?
May 20, 2016 @ 4:19 am
Hi Nellie – are you working on the collar? Or the yoke? There are only 4 markers….
If you are working on the yoke, there are 5 sections, the right front, the right sleeve, the back, the left sleeve, and the left front. There will be markers separating each section. You are increasing on either side of the marker so on the fronts, sleeves, and back.
If you are working on the collar, there is a marker at the right neckline (where you placed a locking stitch marker), start of the back neck, end of the back neck, and end of the left neckline (where you placed the locking stitch marker). You are doubling the stitches at the back neck only.
May 20, 2016 @ 11:43 am
Thank you. Think I got it.
March 11, 2016 @ 11:34 am
Can’t understand first row of pattern: what am I repeating 4 times: m1,k2,m1 which is really k2,m2. or is it k1,m1,k2,m1 for 4 rows?
Also ,row 3 says “knit to last stitch,m1,k1.” If I knit to last stitch,m1, then where is the other stitch to knit?
I am a knitter and have knit many items. I purchased this pattern for 9.79 (C)but am unable to follow the first 2 k rows so I doubt if I will be able to knit it. So disappointed.Hope you can help. Love the sweater but would prefer a pattern to knit from band up.
March 14, 2016 @ 10:47 pm
Hi Eileen – You are repeating the bracketed instructions 4 times. So your first row you are knitting to 1 stitch before the marker, m1, k1, slip marker, k1, m1, then knitting 1 stitch before the next marker, m1, k1, slip marker, k1, m1 etc.
Your make 1 should not use a stitch, try a make 1 (there is a tutorial on it here), that should clear up the row 3 issue.
March 17, 2016 @ 11:04 am
😡 Thank you….now I know what the problem is! I’ve been trying to increase stitches by using a stitch and knitting into back of stitch. I had forgotten about increasing by this method which now makes m1 make sense!
February 22, 2016 @ 10:53 pm
So on the pattern it just says M1 but doesn’t indicate what type of M1 been doing make one right before the marker and make one left after the marker which works fine until row 3 when you were asked to add another make one. Is there certain method that you suggest? Also the pattern that I have on the digital e-book does not indicate a provisional cast on but I see it in the above pictures so are we supposed to use a provisional?
February 22, 2016 @ 11:39 pm
Hi Kelly – preference for m1’s is kind of knitters choice, I usually work a m1r before the marker and an m1l after. For the neckline increases I chose an m1l to start the row and an m1r at the end.
(the provisional cast on is from an older version of the pattern)
Avoiding the Sweater Curse: Knits that Fit the Entire Family | Tin Can Knits
November 17, 2015 @ 11:02 am
[…] sweater, because it allows you to learn all of the techniques but requires much less time and yarn [check out the Gramps Cardigan tutorial here]. With a baby sweater, you build your confidence and skills so that when you decide to knit for […]
September 27, 2015 @ 2:38 am
Thanks for available tutorials on knitting..Am anxiously waiting to learn..Thankyou…Joy
September 7, 2015 @ 7:01 pm
I’ve loved knitting this and want to get the last bit right. I’d like to do German short rows as explained in your tutorial but can’t work out how to do it in rib. Is it possible?
September 12, 2015 @ 6:28 pm
I can’t see why not, you would just work the stitch according to the type of stitch it is (if it is a knit or a purl)
June 22, 2015 @ 10:56 pm
Hi again, well I kept thinking I must be wrong, too many successful projects, I looked and looked and eventually found I overlooked counting in the “two” in letters for the first size which took me to the 7th size! Problem solved, so happy, now I can continue …..
June 22, 2015 @ 4:54 pm
I love this pattern, it’s so cute. I’m making the 6th size for 6-8 years. Have done all the shaping on the yolk but where it says to work rows 1-2 one more time I would end up with 8 more stitches than the stated 203. Should this say 0 more times or should I end up with 211 stitches to make the sizing correct? Thanks for your help with this.
My first every baby knit…
June 22, 2015 @ 2:00 pm
[…] As my first knitted garment, the process flowed quite smoothly since tincanknits hosted a tutorial walkthrough of the gramps cardigan. Still, I wouldn’t say that this sweater was the quickest thing in the […]
May 4, 2015 @ 1:43 am
Knitting sweater for babies needs an expertise to knit sweater in such way that it should look beautiful as well as it can save babies from winters as well. The techniques and steps mentioned here are really very effective and very fast which will help everyone during knitting a nice sweater for their babies very fast..
April 30, 2015 @ 1:34 pm
Great sweater. Going to try making it!
April 21, 2015 @ 12:28 am
May be a dumb question but I’m still new to knitting and this is the only thing I can’t seem to solve by googling in (lol). When making the button holes with the pattern, it says to turn work and CO 3 sts knitwise, then turn back and proceed to next buttonhole. What does it mean to cast on knitwise?
April 23, 2015 @ 10:51 am
Hi Madison – you can also NOT turn your work and cast on using the backwards loop method, but to work a knitted cast on you can check out our tutorial here (instead of using a slip know you will use the stitch already on your needle)
March 8, 2015 @ 7:05 pm
I just need the pattern. How can I get it? I don’t need the tutorial right now.
March 9, 2015 @ 3:29 pm
It is available on our website under ‘patterns’ or you can click the gramps link in the opening paragraph
A grumpy wee sweater….. the update! | crafting, life and the art of happiness
January 16, 2015 @ 5:31 pm
[…] sweater by Emily Wessel! It was a pretty easy pattern to follow; it is well written, and the blog she wrote to walk you through it was definitely a life saver more than once :). I have to say, I […]
December 30, 2014 @ 1:57 pm
I am so so frustrated. I am trying to begin the sweater and I am already confused. I did the set up row and then I began the next row and do not understand what I am supposed to do. The instructions say to knit to one stitch before the first marker. Then there is one stitch left. How do I knit to 1 st before marker, m1, k2, m1 when there is only one stitch. Thanks for your help.
January 5, 2015 @ 6:31 pm
Hi Debbie
Just slip the marker when you come to it. You are knitting 1 st, slipping the marker, knitting 1 more st, and m1
Liam’s Gramps | In Among the Heather
November 28, 2014 @ 7:15 am
[…] loved this project. Absolutely loved it. The pattern was well written and the tutorial on the Tincanknits blog made any issues I had completely disappear. This was my first in the round sweater, so I […]
September 15, 2014 @ 7:46 pm
I have picked up the stitches for the button band/shawl collar. Once picked up, there is a set up (WS) row, then a ribbing (RS) row. The next instruction is for Short Row collar setup row A (RS) and set up row B (WS)
Do I do another row of ribbing (on wrong side) between the button band set up and ribbing rows and the short row collar shaping set up row A and B? Or do I start on the wrong side for Row A?
September 18, 2014 @ 11:01 am
Hi Nancy
Sorry, there is an errata (not yet listed), omit the second ribbing row before proceeding (or rib 1 more row if you have already done it)
September 8, 2014 @ 4:32 am
I am at the set up row for the collar and band. I am not sure if I understand the kfb after the second marker. Does this mean that I will be increasing the stitches across the back of the neck? Do I kfb in every stitch or just the knit stitches of the rib pattern? Thanks for any help that you can give.
September 11, 2014 @ 11:20 am
Yep, you are increasing the sts across the back neck.
April 6, 2019 @ 5:09 pm
Hello! I’m still confused on this one. I understand that I am to increase the Sts across the back neck. But, do I kfb and then pearl front back? Or do I kfb, pearl, kfb, pearl to the end of the back neck?
Your help would be much appreciated.
April 7, 2019 @ 7:59 pm
Hi Ingrid – at the back neck it is just kfb to last stitch, no purls.
May 1, 2014 @ 6:52 am
Hi Emily
Love the sweater. I have learned a lot. I am a bit confused with the knit 2 together bind off for the shawl collar. I don’t know if I’m reading too much into it Would you break it down for me? Thanks a bunch.
May 2, 2014 @ 6:55 pm
Hi Kathy
You will be working a regular bind off up to this point, then across the back neck, you will be working a k2tog bind off. So you will have 1 stitch on your left needle, k2tog, pass stitch over, k2tog pass stitch over, etc.
March 22, 2014 @ 9:07 am
Is it possible to use a simple make 1 on the yoke increases instead of the k1r and k1l? Will this change the appearance and fit of the sweater?
March 25, 2014 @ 2:01 pm
Yep! It’s just knitters preference for how you M1
FO: Gramps Cardigan and Hat | yarn & yarns
March 20, 2014 @ 4:03 pm
[…] only is the pattern put together really well, it has a fantastic blog tutorial. Total win. Wish I was even half as pleased with the yarn. I liked the colors and springiness while […]
February 9, 2014 @ 7:25 am
I love the Gramps sweater, but am having trouble with knitting the wrapped stitches in the collar. In following your tutorial, I get a rather noticeable stretch of yarn across two stitches on the wrong side which will be the visible side of the collar. I am an experienced knitter, but perhaps I am dong something wrong Any help will be appreciated. Thank you! Cindy.
February 11, 2014 @ 8:32 pm
Hi Cindy
Without actually seeing your knitting it’s a bit tricky to tell. It might have to do with how you are wrapping your stitches, it would be worth a try to knit the wrapped stitch together with the stitch it wraps through the back loop.
February 13, 2014 @ 7:18 am
Thanks for the reply Alexa. I could have done something funky, but I have worked with short rows before with no problem. I also noticed this little stretch of yarn on the collar when I zoomed in on some of the Ravelry photos for Gramps. Maybe I’m being too picky!
Anyway… I’m working on the theory that this is something that shows up on the WS when you knit the wrapped stitches. I’ve ripped out the short rows and am doing the turn and wraps on the WS this time instead of the RS, as the pattern indicates since the little stretch should now be on the collar side which is not visible.
We’ll see!
February 18, 2014 @ 7:02 am
Good Luck with it!
January 17, 2014 @ 12:14 pm
When will tutorials be ready?
January 23, 2014 @ 2:16 pm
Check out this page for a full listing of all the complete gramps tutorials: http://blog.tincanknits.com/gramps-tutorial/
This week’s projects | Kat's Ramblings
August 10, 2013 @ 10:54 am
[…] This is the Gramps Cardigan from Tin Can Knits and a kind of swatch/sample of an afghan I’m thinking about making. The pattern for the Gramps cardi can be found here. […]
February 2, 2013 @ 5:18 am
Sweater techniques parts 1-5 how can I get them? This is my first time on this website and am loving it. I know I will learn alot! Thank you so much!
February 2, 2013 @ 9:30 am
Hi Jean – all five links are on this page: http://blog.tincanknits.com/gramps-tutorial/
And you can purchase the sweater pattern to follow along with the tutorial here: http://tincanknits.com/pattern-9M-gramps.html
January 17, 2013 @ 11:02 am
I wanted to say thank you for this beautiful tutorial along with the handsome baby boy, smile.
Share the love | Aphaia | One Stitch More
December 25, 2012 @ 5:56 pm
[…] NORTH (a whopping 26 designs, all available individually too) plus some fabulous tutorials : Gramps top-down sweater series, POP blanket tutorial, and Sweater Sizing […]