
Are you ready to knit your very first sweater? Or have you knit dozens of sweaters in the past, but are now returning to the craft after a hectic time in your life? Well this simple, seamless, top-down sweater might be just the thing to get you started – or bring you back to your beloved needles when you’re ready. Either way, it may just be the comfiest, comfiest sweater you’ve ever knit!
The Simple Sweater is just as promised: simple! But to keep it interesting, this design is available in our inclusive baby-to-big size range. PLUS it includes instructions for three different yarn weights, so you can knit it up in your favourite yarn and needles.
Both Alexa and I have knit it MULTIPLE times…here, here, in handspun three times, and several with rainbow-striped yokes. Since we couldn’t stop knitting it, we figured you all would love it, too!
First step: get yourself a copy of the Simple Sweater pattern… or the Basics Collection, for even better value!

This pattern is EVEN BETTER in the Tin Can Knits app!
- see only the instructions you need
- tick through the pattern and make notes
- support is just a tap away
- adjust the settings to suit you!
Follow these steps to make your Simple Sweater:
- Select your materials: yarn, size – and make a gauge swatch
- Prep for construction
- Cast on and make a neckline plan
- Knit the seamless round yoke: set up, increases, even section
- Add optional short-row shaping (or not!)
- Separate for the body and sleeves at the underarms
- Work that body
- Start the sleeves: shaped or unshaped?
- Finish it up: neckline, blocking

Select your materials: yarn, size – and make a gauge swatch
Selecting a yarn weight: sock (or sport), DK, or worsted (aran)

If you’re unfamiliar with knitting-pattern conventions, this multi-size (and multi-yarn-weight) pattern might feel intimidating, so we’ve got an in-depth tutorial on how to read a knitting pattern that you might find useful.
The first thing you’ll decide is what yarn to use. Since the pattern is written for three yarn-weight options, you’ll have a wide variety of options! A worsted or aran weight sweater knits up quite a bit more quickly than other yarns but is still very warm and cozy. A sock- or sport-weight garment is lighter and more versatile over the in-between seasons, but it takes many more stitches per square inch – and thus is a slower knit. DK is smack in the middle, both in weight and time. It’s for you to decide what you’re looking to make – what works best for your wardrobe and your climate.
In the pattern, instructions that apply to different yarn weights have coloured backgrounds. Each yarn weight has a different background colour: blue for worsted/aran, pink for DK, and yellow for sock. You’ll follow one of those instructions, so be sure to look for the highlight colour that applies to you. For example, the background colour for DK weight yarn is pink, so every time I get to a pattern section that has instructions that vary by yarn weight, I’ll use the PINK instructions.

Still not sure which yarn you want to use? Check out our tutorial on choosing a sweater yarn. The most important thing is that you select a yarn you are happy working with – and one that will be able to meet one of the three pattern gauges.
Choosing a size
Everyone has different preferences when it comes to garment fit. As a knitter, you’ll get to know your own preferences over time and learn to select a pattern size with those preferences in mind. If this is your first sweater project, I suggest reviewing our in-depth tutorials on how to select a size and what ‘ease’ is.


What about lengths? While you’ve likely selected your size based on the finished chest dimension, consider how lengths at the body and sleeves for this size will suit you. Remember, if you plan to lengthen any of the garment dimensions, you’ll probably need extra yarn.
Are you enjoying this tutorial? Find out when all of our helpful tutorials are released by signing up for our email updates!
Swatch for satisfaction (for a garment, gauge is critical!)
Then next step is the swatch. We’ve written a bit about swatching and gauge here for more information. Suffice to say that if your large, blocked swatch doesn’t match the garment design gauge, your sweater will not end up the size that you picked… it’ll be bigger or smaller. You may still love it… but I don’t think I’d take that risk.
Since you are swatching for a pullover, knit in the round, the most critical gauge is your stockinette gauge worked in the round. This means you will need a swatch that is also worked in the round. Why can’t I knit a flat swatch?! Lots of knitters have a different tension in their knits vs. their purls, so their stockinette gauge back and forth (knitting one row and purling the next) is different than their gauge worked in the round, where all stitches are knits. There are a couple of ways to do this. You can either knit a small tube and cut it, or you can work a speed swatch.
To make a tubular swatch you can use the Magic Loop method, or DPNs, to knit a small tube. Cast on about 6-8″ worth of stitches, work a few rows in garter (knit 1 round, purl 1 round), then work about 6″ of stockinette, then a few more garter stitch rows and bind off.


A speed swatch is worked on circular needles or DPNs, a right side row (knit) is worked, and then the stitches are moved to the other end of the needle and the yarn is carried across the back, so you can work another right side row. This way you are always knitting.


The benefit of the tubular swatch is that it’s a little less fussy to knit, while the speed swatch has lots of yarn carried behind that can get a bit messy. Once you’ve cut your tube though you can’t re-use that yarn, but with a speed swatch you can unravel and use that yarn in a pinch.
Don’t forget to block your swatch! Lots of yarns change significantly with blocking so skipping this step is NOT recommended. You want to treat your swatch exactly like you’ll treat your finished garment. If you plan to toss it in the washer and dryer, do that with your swatch too.
There’s LOADS of situations where Alexa and I skip the swatch… but knitting adult garments for ourselves is NOT one of those situations! If I’m knitting a baby, toddler, or kid sweater though… I suppose you can go ahead and skip the swatch! It’s bound to come out fitting somebody…
We have some suggestions on how to select a sweater yarn, and make a gauge swatch to learn what needles you will use for the majority of the knit. If you simply cannot get exactly the stitch gauge we call for, and don’t want to change yarns, you may want to learn about knitting patterns at a different gauge.
If you’re worried because your round gauge (that’s how many rounds in 4″) isn’t same as our pattern, relax… in this pattern it won’t matter… but you have more rounds per inch you may want to buy an extra ball, as a difference in round gauge can effect yardage requirements. Learn more about gauge in yoke sweaters; where it matters, and where it doesn’t.
Understanding what needles you’ll need
One of the things that can be confusing when you’re a newer knitter is understanding which needles you’ll need for a project… and why the pattern lists SO MANY.
For this project, you’ll need smaller diameter needles for the ribbing at neckline, cuffs, and hem. You’ll need larger diameter needles for the remainder of the knit. For the smallest sweater sizes, one set of needles will do, but as the garment gets bigger, you’ll need longer circular needles to accommodate all those stitches.
For the sleeves, which are knit in the round, you’ll need either DPNs or a long circular needle for the Magic Loop method. Whichever style you prefer is just fine.

Adding in a rainbow
Wanna make a super fantastic rainbow yoke for your Simple Sweater? We’ve got a little hack for that! The total number of rounds in the yoke (for each size, each gauge) is listed in the pattern. Take the number of colours you want to work in your rainbow and divide the number of rounds by the number of colours. This formula will tell you how many rows to work in each of your four, five, six, or seven colours! (You probably won’t get a whole number, so just round down.)
Number of yoke rounds / colours in your rainbow = number of rounds per colour (round down).
For my sweater, I’ve got 38 rounds at the yoke and five colours. 38 / 5 = 7.6, so I’ll round down to get 7 rounds per colour.

Prep for Construction
This pullover is knit from the top-down. The yoke is knit first, and then the body and sleeves are separated. The body is worked in the round to the hem, and the sleeves are worked in the round to the cuffs. The neckline can be worked first or picked up and knit last.

Cast on and make a neckline plan
Once you cast on, you can begin this sweater one of two ways: work the neckline ribbing first and then proceed to the yoke, or knit just one round before starting the yoke. The ribbing-first method is simpler, but working ribbing last is easier to adjust. It also adds more structure for the rest of the garment to hang from (this is especially useful for larger sizes and heavier yarns).

What’s important here is to cast on REALLY loosely, especially for baby sizes, because the neckline has to stretch over their sweet, gigantic noggins!
Check out our tutorial on casting on with circular needles for tips on joining to work in the round.


Knit the seamless round yoke: setup, increases, even section
Once you’ve completed (or skipped) the neckline ribbing, switch to larger needles (the ones that give you gauge) and set up stitch markers all around the yoke. These markers act as ‘guideposts’, telling where to work your increases throughout the yoke.
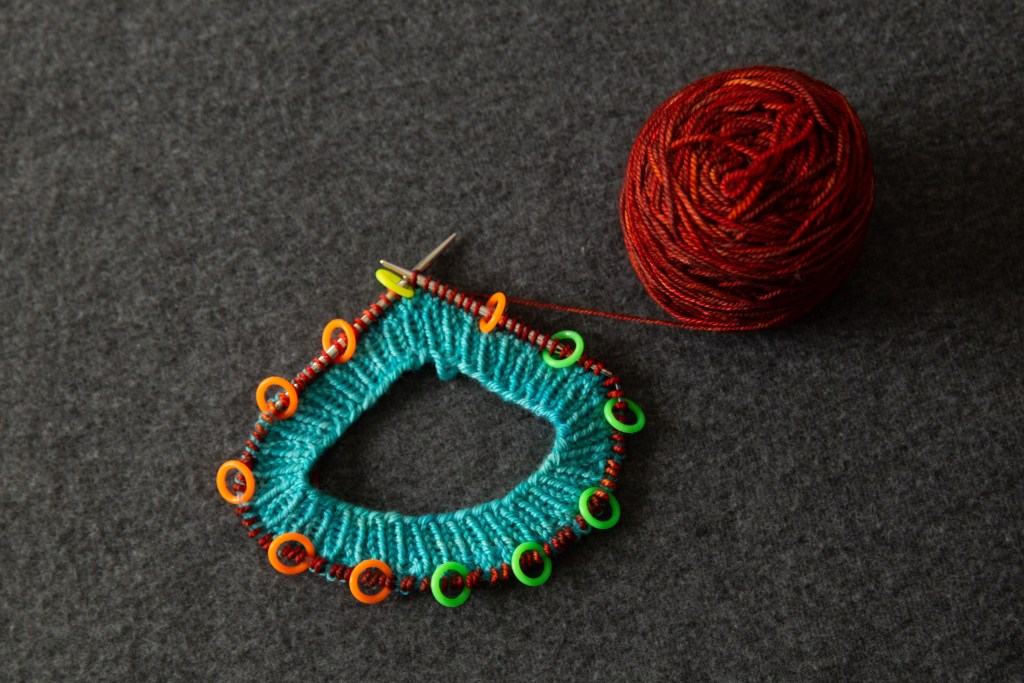
At the yoke, you will increase at each of the stitch markers with an m1 (my favourite m1 method is this one). I used an m1R here, but whichever style you prefer is just fine.

Add optional short-row shaping (or not!)
The Simple Sweater pattern includes optional short-row shaping at the back of the yoke. These short rows are worked at the bottom of the yoke, right before the split for body and sleeves.
Short-row shaping adds a crescent of fabric that raises the back of neckline relative to the front neckline, so there’s a subtle dip in the front neck opening. It’s absolutely not required, so if you’re not emotionally ready (hahaha) to tackle this new technique, go ahead and skip right past! But… it’s also no more difficult to learn than other techniques you’ve already tackled, like casting on, ribbing, increasing, etc.
I usually add short-row shaping on my own round yoke sweaters, but I often don’t bother for kids’ sweaters – and I definitely skip it on baby sweaters. When kids are dressing themselves, it’s easiest if the front and back are symmetrical, so it doesn’t matter which way they put it on. Also, when a kid sweater gets the inevitable ketchup or chocolate stain, you can just turn it back-to-front…cause stains on the back don’t count, right?!
German short-rows are our favourite method, and we’ve included instructions for this style in the pattern – but if you’ve got another method you prefer, go for it!

Once you’ve completed the short rows, you’re back at centre back (CB) of the sweater, and you’re ready to proceed to the most magical part of a seamless top-down sweater…body and sleeve separation.
Separate for the body and sleeves at the underarms
You’ve reached the end of the yoke, and it’s time to separate your BIG cone-shaped tube into three smaller tubes for the body and two sleeves!
This can seem like a confusing and intimidating step the first time you do it, but take a deep breath. Take it slowly…one part at a time.
The first thing I like to do is mark where my sleeves will be with locking stitch markers, so I can do all the counting up front. This is also an excellent moment to count your stitches, so you know if you’ve made an error somewhere.
There are three main parts to this separation round. Some of the stitches – the ones that will flow down and make the back and front of the sweater – you’ll knit across. Other stitches – the ones that will flow down into the sleeves of the sweater – get put on hold on waste yarn for now. And at each underarm, you’ll need to add a few stitches by casting on with the backwards loop cast-on method. At the end, you’ll have a body tube on your needle and two sets of sleeve stitches placed on hold to be worked later.

Once you’ve completed the separation round, the beginning-of-round (BOR) is still located at the CB. Before you work all the way through the remainder of the sweater body, you’ll move that BOR point to the centre of the right underarm stitches. To shift the BOR, simply remove the marker, knit the number of stitches called for in the pattern, and stop. Replace the marker at this new point.

Work that body
The body is easy peasy. Just keep knitting around and around and around…. You get the idea!
The pattern includes two length options: cropped and regular. If the dimensions given don’t suit you, this is a simple place to adjust… just knit longer or shorter before working the hem ribbing.
When you’re ready to work the hem ribbing, switch to smaller needles. Once you’re satisfied with the hem length, bind off all stitches loosely. You can use a knitwise bind-off, but I personally prefer to bind off ribbing in pattern.

Start the sleeves: shaped or unshaped?
Once the body tube is complete, it’s time for the sleeves! You’ll put the held stitches back on the needles and pick up stitches at the underarm. Now you’re ready to work your sleeve in the round. For ALL the details on starting a top-down sleeve (using DPNs or magic loop), check out our tutorial Starting a Top Down Sleeve here.

You’ll have to decide if you want to shape your sleeves gradually, as a slow taper (this is more like a ‘regular’ sleeve shape) or work an ‘unshaped sleeve’ that decreases all in a single step before the cuff.


Then just follow the instructions… knitting around and around for ages and decreasing when indicated. When you hit the cuff, work the decrease and then switch to smaller needles for working the ribbed cuff.
I knit a bunch of Simple Sweaters for myself (three in a row, to be precise) and always worked unshaped sleeves for a comfy, relaxed, and romantic gathered shape at the cuff. Alexa knit Simple Sweaters for Gary, Jones, and Hunter and shaped the sleeves for a more classic fit.


Lately, I’ve also been kind of obsessed with a turned-back doubled sleeve cuff… I’ve been including it on all my kid sweater knits because of the practicality – kids have these rubber arms that stretch out longer and longer (and longer) so quickly! But I also love it on my own sweaters…it makes them feel a little extra oversized and cozy.

Finish it up: neckline
If you planned to work your neckline ribbing later, well, later is now! Pull out your smaller diameter needles (a 16”-20” long circular works well here, but you may prefer Magic Loop or DPNs), and pick up and knit all the way around the neckline, working under the cast-on stitches.


Once you’ve finished the ribbing, take care to bind off fairly loosely; remember that it needs to stretch over your head (or that toddler’s noggin)!
If the neckline is too tight or too loose, it’s best to accept that sad fact and fix it now. The brilliant thing about a handmade sweater is that you can adjust it to fit YOU. The painful thing about a handmade sweater is that YOU must do the adjusting…hahaha! But you’re in luck because we have a whole tutorial full of tips and tricks for getting a perfect neckline.
Et voilà! You now have a finished sweater, and it’s a thing of beauty! Just a couple more finishing steps (feel free to ignore me)…

Sweater finishing
Well, once you’re finished, you’re finished, aren’t you? That’s the beauty of a seamless sweater… There’s VERY LITTLE finishing after the fact. It can almost come right off of the needles and onto your body…and it usually does here in Scotland!
You’ll want to weave in all your yarn ends , using the tails to sew up any little holes you have at the underarms. Then, I recommend giving your sweater a bath. It relaxes the stitches and makes the fabric beautiful. See our sweater blocking tutorial for help with the process.
You can absolutely just lay your sweater flat to dry, or, like I did, use wires and pins for blocking.


Basic basic basic basic… you get the idea, right?!
The Simple Sweater is one of four patterns that are, like the name says, BASIC. But when we do a basic, we try to REALLY do that basic. That’s why we’ve included multiple yarn weights AND our inclusive baby-to-big size range in all these patterns. We believe they’re just what you need: a classic cardigan, this simple sweater, a basic beanie, and some everyday ribbed socks. Each pattern has its own in-depth tutorial to guide you through any and all sticking points, so you can FINISH THAT KNIT and start enjoying some seriously cozy vibes!
A little Simple Sweater inspiration:


Basics Collection by Tin Can Knits:

Classic Cardigan

Simple Sweater

Everyday Socks

Classic Cardigan

Basic Beanie

Simple Sweater
New tutorials, right to your inbox!
We’ll write you a note a couple times a month to share our new knitting tutorials, patterns and stories!


April 14, 2023 @ 3:30 pm
You two have been such an inspiration for me! Your precise information is incredible and because of that I have knit my first top down sweater without pulling my hair out! It came out almost perfect. May the knitting gods be with you always!
Joani
April 13, 2023 @ 3:30 pm
Thank you, a thousand times thank you! This tutorial is so helpful
April 13, 2023 @ 5:39 am
I am blown away by all your wonderful instructions! Love your patterns and your expert advice. Wish I could sit down and knit with you both ❤️🧶❤️
April 13, 2023 @ 3:31 am
Thank you! This is the best post ever! This is the perfect family gift sweater. I better get started!