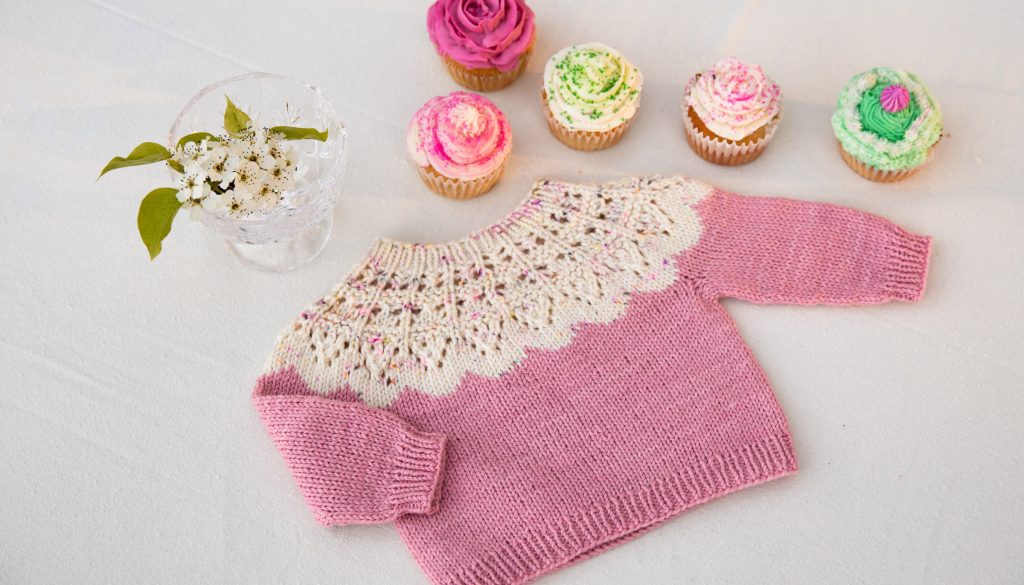
Let’s knit a cute confection! Whether it’s your first sweater, or you’re a pro, we’ve gone in-depth to help you get started, or to get through any sticky bits. Knit one for yourself, or a sweet babe, Cupcake comes sized baby to big.
Cupcake has a delicate lace detail at the yoke, and a sweet little scalloped colourwork detail. Hunter’s wearing the sweater with just the lace, and Margot’s got lace and colourwork.
First step: get yourself a copy of the Cupcake sweater pattern.


This pattern is EVEN BETTER in the Tin Can Knits app!
- See only the instructions you need
- Tap through the pattern and make notes
- Support is just a tap away
- Adjust the settings to suit you!
Follow these steps to make your Cupcake sweater:

Select your materials: yarn, size – and make a gauge swatch
If you’re unfamiliar with knitting-pattern conventions, this multi-size pattern might feel intimidating, so we’ve got an in-depth tutorial on how to read a knitting pattern that you might find useful.
The first thing you’ll decide is what yarn to use. This pattern is written for DK or sport weight yarn, at a gauge of 22 stitches per 4″.
Our knits: We’ve used Tanis Fiber Arts Purewash DK, Puzzle Tree Yarns DK+, and Ritual Dyes Sprite for our samples. For this tutorial I’m using Sandesgarn Double Sunday in Beige Heather and Whipped Cream.

Working in one colour is easy peasy: just pick your favourite colour and go! If you’re working a 2-colour sweater we’ve got a couple of tips:
- Go with a lighter colour on top. Lace really pops in a light!
- A barely there speckle looks very sweet. We would normally shy away from a speckle with lace, but with a subtle speckle? Chefs kiss.
- If you’re feeling unsure, tone on tone is always a great option!
I knit up a few swatches to test out some colour combos. I loved the tone on tone, but I found that two quite different colours worked well too! My blue and green swatch and my pink and blue swatch both have entirely different colours, but it works. I did all of my swatches with the darker colour on the bottom.

For a couple of my swatches I used a sock held together with a mohair, and I quite liked the effect of the mohair halo. I might just have to knit up another Cupcake sweater with that combo!
Still not sure which yarn you want to use? Check out our tutorial on choosing a sweater yarn. The most important thing is that you select a yarn you are happy working with – and one that will be able to meet one of the three pattern gauges.
Choosing a size
I already know about choosing a size, take me to the cast on!
Everyone has different preferences when it comes to garment fit. As a knitter, you’ll get to know your own preferences over time and learn to select a pattern size with those preferences in mind. If this is your first sweater project, I suggest reviewing our in-depth tutorials on how to select a size and what ‘ease’ is.

Hunter is wearing size SM (36.5″) with about 1″ positive ease.

Bodhi is wearing size S (34″) with about 2″ of positive ease.
For kiddos you probably want positive ease, they tend to grow quickly in my experience! For yourself…well that’s a little more personal. We wrote the pattern with a neutral fit in mind, but consider what you like and how you want to wear your sweater.
Margot is wearing size 3-6 months (18″) with about 2″ of positive ease.
What about lengths? While you’ve likely selected your size based on the finished chest dimension, consider how lengths at the body and sleeves for this size will suit you. Remember, if you plan to lengthen any of the garment dimensions, you’ll probably need extra yarn.
Are you enjoying this tutorial? Find out when all of our helpful tutorials are released by signing up for our email updates!
Swatch for satisfaction (for a garment, gauge is critical!)
I know about swatching: take me to the cast on!
The next step is the swatch. We’ve written a bit about swatching and gauge here for more information. Suffice to say that if your large, blocked swatch doesn’t match the garment design gauge, your sweater will not end up the size that you picked… it’ll be bigger or smaller. You may still love it… but I don’t think I’d take that risk.
Since you are swatching for a pullover, knit in the round, the most critical gauge is your stockinette gauge worked in the round. While there is a little lace at the neckline, this won’t affect the fit, so stockinette gauge is key.
The sweater is knit in the round, so you’ll want to swatch in the round. Wait, Alexa, why can’t I knit a flat swatch?! Lots of knitters have a different tension in their knits vs. their purls, so their stockinette gauge back and forth (knitting one row and purling the next) is different than their gauge worked in the round, where all stitches are knits. There are a couple of ways to do this. You can either knit a small tube and cut it, or you can work a speed swatch.
The Tube Swatch: To make a tubular swatch you can use the Magic Loop method, or DPNs, to knit a small tube. Cast on about 6-8″ worth of stitches, work a few rows in garter (knit 1 round, purl 1 round), then work about 6″ of stockinette, then a few more garter stitch rows and bind off.


The Speed Swatch: A speed swatch is worked on circular needles or DPNs, a right side row (knit) is worked, and then the stitches are moved to the other end of the needle and the yarn is carried across the back, so you can work another right side row. This way you are always knitting.


The benefit of the tubular swatch is that it’s a little less fussy to knit, while the speed swatch has lots of yarn carried behind that can get a bit messy. Once you’ve cut your tube though you can’t re-use that yarn, but with a speed swatch you can unravel and use that yarn in a pinch.
Don’t forget to block your swatch! Lots of yarns change significantly with blocking so skipping this step is NOT recommended. You want to treat your swatch exactly like you’ll treat your finished garment. If you plan to toss it in the washer and dryer, do that with your swatch too.
There’s LOADS of situations where Alexa and I skip the swatch… but knitting adult garments for ourselves is NOT one of those situations! If I’m knitting a baby, toddler, or kid sweater though… I suppose you can go ahead and skip the swatch! It’s bound to come out fitting somebody…
We have some suggestions on how to select a sweater yarn, and make a gauge swatch to learn what needles you will use for the majority of the knit. If you simply cannot get exactly the stitch gauge we call for, and don’t want to change yarns, you may want to learn about knitting patterns at a different gauge.
If you’re worried because your round gauge (that’s how many rounds in 4″) isn’t same as our pattern, relax… in this pattern it won’t really matter… but you have more rounds per inch you may want to buy an extra ball, as a difference in round gauge can effect yardage requirements.
Understanding what needles you’ll need
One of the things that can be confusing when you’re a newer knitter is understanding which needles you’ll need for a project… and why the pattern lists SO MANY.
For this project, you’ll need smaller diameter needles for the ribbing at neckline, cuffs, and hem. You’ll need larger diameter needles for the remainder of the knit. For the smallest sweater sizes, one set of needles will do, but as the garment gets bigger, you’ll need longer circular needles to accommodate all those stitches.
For the sleeves, which are knit in the round, you’ll need either DPNs or a long circular needle for the Magic Loop method. Whichever style you prefer is just fine.

For my sweater I’m knitting Bodhi the size S (34″) with short sleeves, and I’m using Sandesgarn Double Sunday in Beige Heather and Whipped Cream
Prep for Construction
This pullover is knit from the top-down. The yoke is knit first, and then the body and sleeves are separated. The body is worked in the round to the hem, and the sleeves are worked in the round to the cuffs.

It’s time to cast on!
Choose the cast on you like best. I’m kinda basic, so I almost always use a long tail cast on. It’s important to cast on loosely, especially in those wee sizes, because your knitting needs to stretch over a head.

Next up is just a little ribbing. Good ol’ knit and purl!

Check out our tutorial on casting on with circular needles for tips on joining to work in the round.
After the ribbing a few sizes have an increase round. If m1’s are new to you check out our m1 tutorial here.
Time for some lace

What IS lace, anyway?
At it’s most basic, lace is a pattern or texture, created by putting some intentional holes in your knit fabric. The Cupcake sweater has some simple lace, using knits, purls, and the following stitches:
- yarn overs (yo) increases
- knit two together (k2tog) right leaning decrease
- slip-slip-knit (ssk) left leaning decrease
- sl1-k2tog-psso double decrease
The most visible part of a lace pattern are the holes. These are made with a yarn-over (yo) stitch. A less visible but critical part of lace patterns are the decreases. Because a yo is an increase, which adds a stitch to the count, we must balance each yo with a decrease stitch, in order for the stitch count of the piece to remain the same (resulting in a fabric that stays the same width).
In this yoke, however, we occasionally want to add stitches, without balancing, to increase the stitch count. On round 11 you’ll find there are 2 yarn overs, but no decreases, so we are increasing the stitch count in that round.
To chart or not to chart?
The lace pattern is in two forms in this pattern: written out and chart. You can definitely follow the instructions line by line, but we always recommend trying the chart.
Knitting charts may LOOK unfamiliar and feel intimidating to you, but if you take it one stitch (one square) at a time it’ll start to make sense. Trust me – with a little bit of practice, most knitters find working from charts makes lace patterns easier to follow, memorize, and troubleshoot.
Working from a knitting chart isn’t difficult, but it involves a few conventions. Charts are worked from bottom to top, so you’ll find round 1 at the bottom of the chart. This sweater is knit in the round, so each charted round is read from right to left. Since this pattern is both written and charted you can compare the two until you get the hang of it.
If you feel like you need more info before taking on charts, check out our details post on knitting charts here.
Charts in the app: In the Tin Can Knits app there are a few useful chart features, you can highlight the row you’re on and give it a tap to advance to the next row. When you close the app and open it back up, your spot in the chart willl be saved and you’ll be right back to where you left off.
Wanna take a deep dive? If you’re loving lace and want to learn more, check out our free email lace course!
Extra markers
If you’re struggling to keep track of stitches and repeats, markers can help. In the image below I’ve placed markers after each chart repeat, so I know right away if something has gone off. I used a different style of marker (actually just attaching a locking stitch marker to a circular stitch marker) to indicate the beginning of round.


Lace complete! I’m ready for a little colourwork.
Colourwork
If you’re working your Cupcake in a single colour you can ignore the last 4 rounds of the chart, and this section. Tap here to skip to the next section.
This sweater has only 4 little rounds of colourwork, but it creates quite a lovely scalloped effect. Colourwork sounds VERY complicated, and can look really fancy. Many knitters hear colourwork and have visions of tiny tangled balls of yarn, puckered knitting, and a general mess. I promise you it won’t come to that!
For the Cupcake sweater we’re just using two colours (in fact, most colourwork only uses 2 colours at a time!), and all of our stitches are knit. You can follow the chart or written instructions.
Your first round of colourwork, round 23, you’ll knit 1 stitch in your main colour, then 7 stitches in your contrast colour. You’ll repeat this sequence all the way around. Easy right?
The only thing to consider here is keeping that float nice and loose. The float is the yarn that is in behind while you’re working other stitches. So while you’re working 7 stitches in your contrast colour the main colour just sort of hangs out in behind. Then you’ll pick up that main colour to work your single stitch and you’ll need to make sure that the little strand in the back is loose enough that those 7 stitches aren’t puckering.
If you’re loving colourwork, or you want a little more detail before embarking, check out our Colourwork 101 tutorial.


I didn’t trap my floats for this project, but you absolutely can if you prefer it!
Short rows and raglan shaping
The Cupcake sweater includes short-row shaping at the back of the yoke for sizes 2-4 and up. We like to skip the short rows for the little ones, since they barely have necks yet, and it’s pretty awesome to be able to put the sweater on without a difference between back and front. These short rows are worked after the colourwork, and they are worked at the same time as the raglan increases.
Short-row shaping adds a crescent of fabric that raises the back of neckline relative to the front neckline, so there’s a subtle dip in the front neck opening.
German short-rows are our favourite method, and we’ve included instructions for this style in the pattern – but if you’ve got another method you prefer, go for it!
First you’ll place all of your raglan markers. Your BOR (beginning of round) marker is located at the centre back, and you’ll place markers indicating the sleeves, front, and back of the sweater. In the image below my yarn is at the centre back, BOR marker, and you can see my 4 raglan markers.

For this pattern you’re working your short rows at the same time as your raglan shaping. To create the raglan shaping you’re going to increase on either side of each marker. There are lots of increase methods you can use here, but I like to use a classic m1. I use a m1R before the marker and a m1L after the marker. If you’re interested in different increase lines and increase methods we’ve got a tutorial on increase lines here.

Here you can see I’ve got a crescent of fabric that creates more fabric at the back than the front. It looks a little funky, but trust me, it’ll be great.

Here’s a close up of my raglan line, with my m1R before the marker and m1L after.
Once you’ve completed the short rows, you’re back at centre back (CB) of the sweater, and you’re ready to proceed to the most magical part of a seamless top-down sweater…body and sleeve separation.

Here’s my yoke, ready for separation!
Separate for the body and sleeves at the underarms
You’ve reached the end of the yoke, and it’s time to separate your BIG cone-shaped tube into three smaller tubes for the body and two sleeves!
This can seem like a confusing and intimidating step the first time you do it, but take a deep breath…and one part at a time.
The first thing I like to do is mark where my sleeves will be with locking stitch markers, so I can do all the counting up front. This is also an excellent moment to count your stitches, so you know if you’ve made an error somewhere.
There are three main parts to this separation round. Some of the stitches – the ones that will flow down and make the back and front of the sweater – you’ll knit across. Other stitches – the ones that will flow down into the sleeves of the sweater – get put on hold on waste yarn for now. And at each underarm, you’ll need to add a few stitches by casting on with the backwards loop cast-on method. At the end, you’ll have a body tube on your needle and two sets of sleeve stitches placed on hold to be worked later.

Once you’ve completed the separation round, it’s smooth sailing – you’re ready to knit, knit, knit your way through the sweater body! Your cupcake sweater will look like this:

Here’s my sweater with sleeves on waste yarn, underarm stitches cast on, and I’m ready for all that stockinette body.
Work that body
The body is easy peasy. Just keep knitting around and around and around…. You get the idea! After a few inches it’s a good time for a fit check. Here I’ve got Bodhi trying it on, just to make sure I’m on the right track.

The pattern includes two length options: cropped and regular. If the dimensions given don’t suit you, this is a simple place to adjust… just knit longer or shorter before working the hem ribbing.
When you’re ready to work the hem ribbing, switch to smaller needles. Once you’re satisfied with the hem length, bind off all stitches loosely. You can use a knitwise bind-off, but I personally prefer to bind off ribbing in pattern.

Start those sleeves
Once the body tube is complete, it’s time for the sleeves! You’ll put the held stitches back on the needles and pick up stitches at the underarm. Now you’re ready to work your sleeve in the round. For ALL the details on starting a top-down sleeve (using DPNs or magic loop), check out our tutorial Starting a Top Down Sleeve here.

Here are my sleeve stitches on hold, and my underarm stitches. These are the stitches I’ll be picking up to create my sleeve.
Short sleeves or long sleeves: How do you like it?
Are you creating a cute spring tee or a warm fall sweater? It’s time to decide! It’s honestly a tough call. Margot looks adorable in both short sleeves and long sleeves, I love the casual look Hunter has created with her long sleeves, and Bodhi looks ready for some shoulder season fun in her wee sleeves. It’s a tough call!


Once you’ve decided on your desired sleeve length you’ll follow the instructions. For short sleeves it’s a bit of knitting and a bit of ribbing, for long sleeves you’ll do a bit of knitting, some decreases, and your cuff.

Et voilà! You now have a finished sweater, and it’s a thing of beauty! Just a couple more finishing steps to make your knit shine!

Sweater finishing
That’s the beauty of a seamless sweater… There’s VERY LITTLE finishing after the fact. It can almost come right off of the needles and onto your body. With lace, however, I find blocking makes a BIG difference, so the extra steps to block are worthwhile.
You’ll want to weave in all your yarn ends , using the tails to sew up any little holes you have at the underarms. Then, I recommend giving your sweater a bath. It relaxes the stitches and makes the fabric beautiful. See our sweater blocking tutorial for help with the process.
In the image below you can see what my lace looks like before blocking. It’s more 3-dimensional, and it looks a little meh. The pattern doesn’t come through as well, and the colourwork is always a smidge uneven before blocking too.

You can absolutely just lay your sweater flat to dry (that’s what I did), or you can use wires and pins for a more exact block. I soaked my sweater in cool water and a little wool wash, and rolled it in a towel to squeeze out as much water as I could. Then I just laid it flat to dry.
Sometimes when blocking a sweater (especially if it’s still quite wet) can be blocked to dimensions that are not desirable. Keep your measuring tape handy to make sure you don’t block your sweater too long or too wide.

For this Simple sweater I was feeling a little more diligent. I used wires and pins to get things juuuuust right.

Wanna know more about blocking? Check out our sweater blocking tutorial here.
That’s it! If you’ve enjoyed this tutorial and want to know when more are released, sign up for our email updates!


Lovely Lace from Tin Can Knits

Prairie Fire sweater

Bounce blanket pattern

Winding Way

Love Note

Estuary shawl pattern

Raindrops Sweater

September 1, 2026 @ 10:28 am
This tutorial came at just the right moment for a sweet cupcake I am knitting for a friend’s new great granddaughter. I am new to lace knitting, thanks to your wonderful online class, so needed a bit of hand holding through this project in spite of years of knitting ganseys and other daily wear. When it fits a wee person, with parental permission, I will send a photo of the finished project. I found the lace fairly easy, but had to pay close attention as small errors led to frogging and sailor swearing. In the end it has been worth it!! On to the wee sleeves…
September 7, 2026 @ 2:44 pm
So glad we could help!
August 27, 2026 @ 3:13 pm
A Fabricville shop near me was closing and so I got a lot of wool cheap to knit a cupcake sweater for each of my 4 granddaughters, 8, 7, 5 and 2. I hope the combinations I have will work out. I have been swatching, but will unravel and do swatch in the round or the other method as you recommend. Happily just one is needed as the wool is all the same! . I never get gauge – I am a loose knitter. Oh well. Thank you so much for the pattern and this tutorial. 🥰
August 31, 2026 @ 11:51 am
Ooh, they’re gonna look so sweet in their matching sweaters! It’s pretty nice to be able to knit 1 swatch for 4 sweaters…makes it worth your while!
August 24, 2026 @ 6:20 pm
Tin Can Knits strikes again! Absolutely adorable!