
The Antler cardigan employs one of our favourite construction methods: bottom up! The Antler Cardigan pattern is available here, so get your copy and away we go!
6 Steps to Knit an Antler Cardigan

Materials and Sizing
If you are new to knitting patterns the materials page can be a little overwhelming! Check out our tutorial on how on understanding the materials section of a knitting pattern here. To knit up an Antler Cardigan you will need:
- The pattern: download the Antler cardigan pattern here.
- Yarn: The Antler cardigan is knit using worsted/aran weight yarn. See the pattern table for yardage requirements and check out our tutorial on choosing a sweater yarn here.
- Needles: US #6 / 4mm and US #8 / 5mm needles. You will need circulars and double pointed needles (DPNs) in both sizes, the length of the circular needle required will vary by size. If you prefer, you can skip the DPNs and use a long circular needle for the magic loop method. It is critical that you check your gauge, you may require different needle sizes than suggested, but gauge is paramount.
- Notions: stitch markers, darning needle, cable needle, and 5-11 3/4″ buttons
Before starting any sweater, but especially an adult sweater, you want to make sure you review our tutorial on gauge to ensure your sweater comes out to the dimensions you want. To learn about choosing a sweater size, check out our tutorial on choosing your size here.
Antler is adorable on little ones and grown ups too! Make a wee size to learn the techniques, or jump off the deep end and get started on a sweater for yourself!
Sleeves and Body
Why start with the sleeves? The best reason to start with the sleeves is to get a gauge swatch without a gauge swatch. Just cast on, work your ribbing, knit about 5 inches of sleeve and check your gauge and whether or not you are satisfied with the fabric. If you like the fabric and you are on gauge, just keep going! If not you probably only have to rip back to the ribbing.
To knit the sleeves you will be casting on at the cuff (using your smaller needles) and working to the underarm. You can use either double pointed needles (DPN’s) to start, or a long circular for magic loop. Check out our tutorial for casting onto DPns here. Check out our magic loop tutorial here.
You can either place a marker (more on how to place and use markers here) if you are using magic loop, or distribute your stitches as follows if you are using DPN’s:
Distributing your stitches on DPN’s: I am a die hard DPN fan, but you can’t place a marker on the beginning or end of a needle. So instead I put about 1/2 of my stitches on the first needle, 1/4 on the second and third needles. This way I always know the beginning of my round starts at the beginning of the ‘big’ or ‘full’ needle. No markers required!

Once you have completed the ribbing, you will change to larger needles and start working your sleeve increases. Changing to larger needles is simpler than it sounds, instead of continuing to work with your smaller needles, grab your larger needle in your right and and start working the stitches from the smaller needle to the larger. No need to move stitches, just start knitting.


Sleeve Increases
You can m1 (make 1 stitch) any way you like but my favourite way to m1 is this one here. I use a make 1 left at the start of the round and a make 1 right at the end of the round. Once the number of increases for your size have been worked, you will knit each round until your piece measures the specified length or the desired length to underarm. Measure twice!
To prepare for joining sleeves to body, place the first and last 3 (3, 3, 3, 3, 4, 4, 4, 4, 4, 4, 5, 5, 5, 6, 6, 7, 7) sts of the round on hold for underarm, and the remaining 24 (24, 26, 28, 30, 32, 36, 38, 44, 48, 52, 56, 60, 66, 70, 78, 80, 84) sts on hold separately.
To accomplish this you will need some waste yarn and a darning needle. You will put your sleeve stitches on hold using waste yarn, and the under arm stitches on hold on a separate piece of waste yarn. Make your second sleeve the same as the first.
Making 2 the same: There is nothing worse than finishing a sweater and finding out your sleeves are not the same size, so make a few helpful notes along the way!
- How many rows in your ribbing?
- How many rows after you finish your increases?
- Did I knit anything NOT according to the pattern?
Make these helpful notes and you will have 2 identical sleeves ready to join later.
Helpful Hint : How to avoid ‘ladders’
Ladders look kind of like runs in a stocking. They are loose stitches and gaps in the fabric that sometimes occur between the last stitch of one needle and the first stitch of the next. How can you avoid this? Simply make sure to give an extra tug to your yarn on the first stitch of a needle, this will make it extra tight and prevent ladders.
Body
This part is pretty easy peasy. Just cast on using smaller needles, working back and forth in ribbing pattern to specified length. Change to larger needles and work in stockinette (knit 1 row, purl 1 row) until piece measures the length specified for your size or the desired length from underarm, ending with a WS (wrong side or purl) row.
Join Body and Sleeves

Now for the fun part! Once you join the body and sleeves it will start to look like an actual sweater. To get ready place the sleeve stitches back on the needles (leaving the underarm stitches on waste yarn for later). Your working yarn will be attached to the body and you will be ready to work a right side row.
You will be knitting across the right front, placing body stitches on hold for the right underarm, knitting across the right sleeve, knitting across the back, knitting across the left sleeve, placing body stitches on hold for the left underarm, and knitting across the left front.


That ugly underarm
Now that the body and sleeves have been joined you will have stitches on waste yarn from both the sleeves and the body. These will be joined once the yoke is finished to create the underarm. They look something like this:

Yoke
The yoke starts out pretty simple, just a few rows of stockinette. Since the joining row was a right side row, your first stockinette row will be wrong side row. Next you’ve got a decrease row. If this is your first experience with a k2tog (knit 2 stitches together) check out our k2tog tutorial here.
Time for cables! For the Antler cardigan you can either follow the charts, or the written instructions. For more information on how to read a knitting chart check out our chart tutorial here. If cabling is new to you, check out our cable tutorial here.
Each row has 2 stockinette edge stitches, and 16 stitch cables separated by five purl stitches. Below you can see what my knitting looks like after the set-up row.
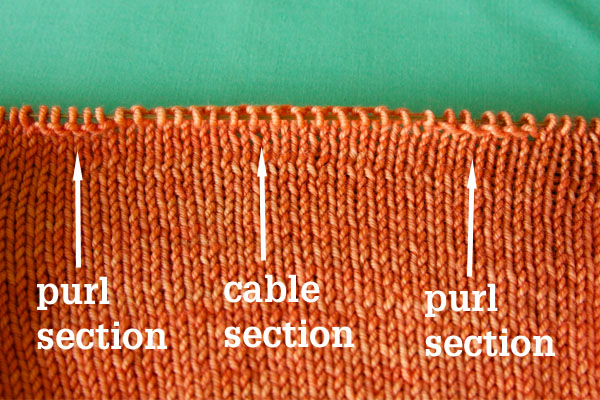
On the RS (right side) rows you will be working the cable chart, on the WS (wrong side) rows you will be working your stitches as established. What does this mean? You will be ‘knitting your knits and purling your purls’. Another way to think of it is: if you see a knit, knit it, if you see a purl, purl it.
Repeat the cable pattern as many times as specified for your size, and then proceed to decreases. The decreases are shown in the same manner as the cable section. You can follow either the chart or the written instructions. There are a few new techniques in the cable section: purl 2 stitches together and the cabled decreases. If purling 2 sts together (p2tog) is new to you check out our p2tog tutorial here. The decreases that are worked within the cable (c4bd and c4fd) are worked using a knit 2 together (k2tog) within the cable.
Work decrease chart to specified row (row 9 for child sizes and row 13 for adult sizes. One last decrease row and then it’s time to switch to smaller needles, a little ribbing, and a bind off!
Button bands
Button bands are picked up and worked last. You will be picking up about 4 stitches in every 5 rows. This means you will pick up 4 stitches, skip 1 row, pick up 4 sts, etc. and you will want to end up with an odd number of stitches in total.
Tip: make a note of the number of stitches picked up on the first button band. You will want to pick up that same number on the other side.
You can find our full tutorial on how to knit a button band here.

Finishing
Finishing a sweater can be the most important part. The first thing you need to do is to sew up those pesky underarms, to do that check out our underarm tutorial here.
The next step is blocking your sweater. Some knitters skip this step but DON’T! That yarn has been running through your fingers and your sweater at least needs a wash. Blocking will help your stitches to lay flat and will help show off those lovely cables.
Lastly (but maybe most fun?!) you can choose your buttons and sew them on corresponding to your buttonholes.

Finished! You can pop your beautiful sweater on and wear it out with pride (or put it on a wee one if you’ve knit a small size!). Now that you’ve knit your first bottom-up sweater you can tackle your next!
More bottom-up sweaters from Tin Can Knits


December 13, 2021 @ 5:27 am
Hi – I’m knitting size 2-4 in the antler pattern and am having difficulty understanding the decrease section for the yoke.
Per instructions I have 135 sts and need to decrease to 90sts after row 9. As I read the chart, my decreases get me to 102 sts
I calculate the decreases to be 33 sts : Row 1 =14 sts, Row 5 = 12sts, row 9 =7sts. I’m missing 12 stitch decrease where?? What am I misunderstanding? I must be reading the. chart or instructions incorrectly.
I have 6 cable patterns in the yolk. Thank you
December 13, 2021 @ 1:36 pm
Hi – It sounds like you are possibly missing the decreases in the purl stitches between the cables?
December 13, 2021 @ 4:05 pm
Thanks for your help and suggestion, I’m kinda new to charts and needed someone to double check for me. I just noticed that I missed the K2tog decrease in the cable decrease row, I hadn’t noticed the k2tog after the cable decrease.
October 18, 2021 @ 10:31 pm
Do you have instruction for knitting an adult cardigan sweater with raglan sleeves on straight needles from the bottom up. 2fronts 2 sleeves and a back?
October 20, 2021 @ 1:16 pm
Hi – Sorry, just with sleeves knit in the round and body in once piece (all the same principles apply whether it’s a child size or an adult size for our patterns)
August 26, 2020 @ 12:33 pm
I am having trouble deciphering row 5 on the cable decrease of the Antler sweater. I am doing size 5 and can’t get it to workout!
August 26, 2020 @ 10:40 pm
Hi Joanne – Are you potentially missing the cabled decreases?
July 27, 2020 @ 12:18 pm
Can you please explain the “no stitch” in the antler sweater yoke decreases.
July 28, 2020 @ 11:33 am
Hi Julie – It means just that, no stitch. You can just ignore that box entirely and move to the next one.
July 28, 2020 @ 12:20 pm
Sorry I’m confused. But do I continue in the pattern with the “no stitch” I’m on row 5.
July 29, 2020 @ 1:24 pm
Hi Julie – You just ignore that box completely. It doesn’t not correspond to any sts in your knitting.
July 28, 2020 @ 1:42 pm
So should I not have those two stitches to work? I’m trying to figure out if I did the first row of decreases incorrectly. So frustrating because I’ve made this once, and I can’t remember!!!!
Pacific Knits | Tin Can Knits
July 24, 2020 @ 11:46 am
[…] Low Tide would make an excellent summer sweater If you have tried cables before the Antler cardigan may be the perfect first sweater! We have a step by step tutorial here. […]
June 19, 2020 @ 6:04 pm
I read in the help section under Antler Sweater, there would be an update post for button bands. Can you tell me where I might find that? Not sure the date of the post.
June 22, 2020 @ 12:13 pm
Hi Julie – Ooh, thanks for letting us know! I hadn’t linked that up yet. The link to the button band tutorial is now in the post: https://blog.tincanknits.com/2014/01/24/how-to-knit-a-button-band/
Branch Out! | Tin Can Knits
April 2, 2020 @ 2:00 am
[…] If you have tried cables before the Antler cardigan may be the perfect first sweater! We have a step by step tutorial here. […]
February 29, 2020 @ 10:23 am
I am making the size 1-2. I did all the correct number of stitches, but after adding the sleeves, I’m 12 stitches over what the pattern says, as well as the the two front sections are not symmetrical. I’m going to undo back to the row where the sleeves are added, changing the number of stitches so it will be symmetrical. I saw that the number of stitches after the yoke decrease should be divisible by 21. My number of stitches will be, but what the pattern says will not be. I’m winging this. I hope you will agree with me. Hut
March 2, 2020 @ 1:00 pm
Hi Barbara – it sounds like maybe you haven’t put the underarm sts on hold?
November 6, 2019 @ 2:46 pm
My first attempt and I love this pattern for a toddler – easy to read instructions.
Antler Cardigan – Cardigans
June 17, 2019 @ 12:20 pm
[…] Helpful Tutorials Antler Cardigan tutorial […]
June 13, 2019 @ 5:55 pm
I am getting ready to start the Antler Cardigan. Do I use the long-tail cast on for the sleeves or a different one?
Thank you,
Sherry Stengel
June 13, 2019 @ 10:21 pm
Hi Sherry – It’s knitters choice, but I used the long tail cast on
August 12, 2018 @ 9:59 pm
Pls advise a good finished back length for a 3 year old boy. Im knitting for twins and wd really like to get it right. Thx
August 13, 2018 @ 2:46 am
Hello Cathleen –
The finished measurements are listed in the pattern, and on the page here: http://tincanknits.com/pattern-9M-gramps.html
We use length from underarm to hem in our patterns.
Beyond the decisions we made pattern sizing, I can’t recommend ‘a good finished length’ for a 3-year old, as they vary SO widely. If you can ask the child’s parent to measure one of their commercial sweaters that fits (and measure from underarm down to hem) that might help. We always recommend to make kids a size above so that they can use the sweater for a year or more.
June 20, 2018 @ 9:32 pm
This is fantastic, thank you! I’m making the 6-12 month size, and now that I am a good ways into the body, I see that accidentally cast on 80 stitches instead of 81. Can I make up for this by decreasing 1 less stitch later on, or will that mess up my yoke? Should I just pull it out and start over with the body, or is what I have salvageable? Thank you!
June 20, 2018 @ 9:45 pm
Yep! One stitch is no problem, just toss an extra decrease in before the cables at the yoke.
June 21, 2018 @ 6:01 am
Thank you! Do you mean one less decrease? I cast on one too few stitches. Will it still work to decrease one less time? Again, thank you SO much!
June 25, 2018 @ 4:33 am
Yeah, just do one less decrease! Or an extra decrease and your ribbing will be 2 sts less than pattern (but will still work just fine). Enjoy!
May 29, 2018 @ 10:01 pm
I am knitting my 2nd Antler Cardigan for my son, and I just found what I hope is not a catostrophic mistake.
I cast on 93 stitches for the 2-4 year old size, but I increased the sleeves to 40 stitches which is actually for the next size. Can I just decrease 14 stitches evenly to set up for the cables to get myself back to the correct number for the size I’m knitting? I have 6 stitches on hold, not 8. I was thinking I could join the sleeves and knit the first round and then spread my decreases over the next two rounds and keep them close to the sleeves. I’m ok with the sleeves being roomier because the sleeves on the first sweater were a little too tight to layer easily.
I hope you can advise me.
June 2, 2018 @ 7:11 am
Hi Melanie – no catastrophe at all, just decrease the extra sts on the set up round for the cables
April 23, 2018 @ 7:07 pm
I am on row one of the decreases .. when it says k2( p1, p2 tog twice, row 1cable pattern .. do I repeat the p1, p2 tog twice as in the chart or have I already done that part? Hope you understand my question
April 25, 2018 @ 10:36 am
Hi Cheryl – You are decraesing at every purl ditch, taking the purl sts between the cables from 5 sts to 2. Does that help?
March 22, 2018 @ 8:16 am
Hi, Alexa! Thank you very much!
March 21, 2018 @ 1:30 am
Good afternoon! Forgive, your name?
I very much had liked your cardigan. I want to connect such to my little girls, 2 years. You have in detail described all knitting, but it is no very clear to me how to tie sleeves to the main product. And there is an instruction in Russian? I will be very grateful to you.
Best regards, Lyudmyla.
March 21, 2018 @ 11:30 am
Hi Lyudmyla – Sorry, we don’t have a Russian translation for this one, but if you follow the pattern instructions stitch by stitch it will work!
March 3, 2018 @ 6:47 pm
Great sweater. Almost finished. Can you tell me how to calculate 5 button band for 1-2 size? How many rows between buttons?
The button hole sounds complicated. Is there an easier way?
Do I wash the sweater in a sweater wash or just steam it?
Thanks.
March 7, 2018 @ 10:11 am
Hi Ann – because the button band is picked up at a certain rate, not at a number of sts, I can’t give you an exact answer, BUT we have a button band tutorial that should help here: https://blog.tincanknits.com/2014/01/24/how-to-knit-a-button-band/
February 27, 2018 @ 3:56 pm
I am worthy sleeves. Third size. I cast on 32 stitches and work increase row plus 5 rounds twice. Each increase row has 2 in erases. So that would be 4 increases total which would be 36 stitches. The instructions say I should have 34 stitches. Not 36. Thank you.
February 28, 2018 @ 8:58 am
Hi Ann – it says to repeat those 6 rounds until you have 34 sts, so you only work them once.
January 5, 2018 @ 8:06 pm
When joining body and arms in preparation for knitting the yoke, the instructions say (I’ll use smallest size for example): Knit 15 body stitches (right front). Put next 6 body stitches on hold (right underarm.) Knit 24 held stitches from right sleeve 9 (all except underarm stitches.) Knit next 37 stitches from body (back.) Put next 6 body stitches on hold (left underarm.) Knit held stitches from left sleeve as right. Knit remaining body stitches.
So, there are stitches held from the right edge of the right front body piece, and from the left edge of the back body piece. This seems asymmetrical. Can you address this?
January 7, 2018 @ 3:50 pm
Hi Tanya – there should be 15 sts at each front, 37 sts at the back, 6 sts on hold at each underarm, plus sleeve sts. That should all be symmetrical
November 27, 2017 @ 7:28 am
Do you have a video for joining the sleeves? I need to see it understand.
November 27, 2017 @ 7:30 am
I need to see it to understand I mean lol
October 21, 2017 @ 5:19 pm
I have the Pacific Knits book and plan on making both the Antler Cardigan and the North Shore pullover. This is my question…would it be possible to turn the antler sweater into a pullover also? My purling is never the same tension as my knitting – consequently, I love knitting in the round! I might be able to figure it out on my own, but would love any tips! Btw- your instructions are so easy to follow! I’ve knitted the flax pullover twice!
October 22, 2017 @ 8:28 pm
Hi Pam
You absolutely can! It’s been kind of a common request lately. The only thing to remember is at the start of the yoke you want a number that is divisible by 21 (16 antler sts and 5 purls sts) and you don’t need any edge sts. Once you have completed the decreases, before the ribbing, just check to make sure your neck isn’t too wide for a pullover. If it is just work 1 round decreasing to the number you want for the ribbing.
The only other consideration is where the cables will fall, for example, do you want a cable directly in the middle of your yoke, or would you prefer not.
October 24, 2017 @ 12:52 am
Thank you, Alexa! I’m hoping to cast on soon! This one has been swirling around in my head for ages and I’m excited to try it! Your info was great! Many, many thanks for taking the time to answer! 😉❤️
September 30, 2017 @ 3:49 pm
Thank you so much for this tutorial. I just cast on the o-6month size and needed a visual for the sleeve portion.
July 17, 2017 @ 8:20 pm
I’m working on the Old Growth sweater, and I attached the sleeves, but after working in stockinette for a few rounds, I noticed that the sleeve section is reverse stockinette :( Obviously this isn’t correct, but will it cause me to be unable to Kitchener the underarm at the end? Do I need to go back and try again on attaching the sleeves? Or can I keep going, using that reverse stockinette as a “design element” and have the underarms work out okay in the end?
July 17, 2017 @ 9:11 pm
I meant “for a few rows,” not rounds.
July 19, 2017 @ 11:26 am
Hi Wendy – hard to say without a picture. You can still graft the underarm, even if the sleeve is in reverse stockinette. Was the sleeve inside out when you attached it?
July 19, 2017 @ 11:32 am
The sleeves aren’t inside out, just the yoke where I attached the sleeves. And not the whole yoke, just the sections where the actual sleeves are. I don’t know what happened lol. If a picture would still be more helpful, I can definitely send one over (is email okay?) later today.
May 31, 2017 @ 3:37 pm
HI! I was wondering if there is a written decrease section, the chart is making me crazy! 😜
May 31, 2017 @ 10:56 pm
Haha, it’s on page 3, right next to the chart for the single pattern
June 1, 2017 @ 7:41 am
omg….I was just on row 1 and figured when it said work antler cable I had to read the chart…..:P
April 17, 2017 @ 5:29 pm
Is it possible to work/add/??? a shawl collar to the sweater without having to possibly rewrite the pattern? I’m invisioning a Cowichan-esque sweater.
April 18, 2017 @ 9:40 am
I think you would need to make it a v-neck in order to add the shawl collar, so I’m afraid that’s a bit of re-write. It would also cover a lot of the cables.
Let’s knit a bottom up sweater | Tin Can Knits
March 28, 2017 @ 9:47 am
[…] There are many ways to knit a sweater (probably as many as there are ways to knit!), but one of our favourite construction methods is knitting from the bottom up. All of the sweaters in the Heart on my Sleeve collection are worked this way, as well as many other TCK sweaters. If you are looking for a tutorial on a bottom up cardigan check out our Antler tutorial here. […]
That pesky underarm | Tin Can Knits
March 28, 2017 @ 9:46 am
[…] for tutorials on bottom up sweater you can check out our Antler Cardigan tutorial or our bottom up sweater tutorial for Heart on my Sleeve […]
An Antler for Bodhi | Tin Can Knits
March 16, 2017 @ 6:00 am
[…] you are a bit tentative to try it, the Antler makes a great first sweater and we have a step by step tutorial that takes you from cast on to button […]
January 13, 2017 @ 2:09 pm
I like to knit in the round. Can this sweater be worked in the round and then steeked?
January 16, 2017 @ 11:29 am
Hi Susan – Yep, you could, you would need to add in your steek stitches and convert the chart to working in the round (that part is super easy, on even rounds you are just knitting the knits and purling the purls)
January 20, 2019 @ 7:47 am
If working in the round with steeking in mind—After decreasing the yoke to set up for cables, would you include the “Purl 1 Row” part, or move on to the Cable Set Up row?
Thanks!
January 21, 2019 @ 10:59 am
Hi Meridith – I would probably leave in the ‘purl 1 row’ (But if you are working in the round it would be a knit row)
December 28, 2016 @ 1:50 pm
I would like to make this sweater as a pullover. Have you figured out how to adapt the pattern to a pullover?
December 28, 2016 @ 2:05 pm
Hi – you would want to add a few stitches at the fronts to compensate for the button band. Then, after the join at the yoke you would want to decrease to a number divisible by 21 (5 purl stitches and 16 antler stitches). You would work the chart in the round, which means on even numbered rounds you would knit the knits and purl the purls.
September 19, 2016 @ 1:21 am
I’m going to try to knit the chest size 35 but I have one problem my granddaughter plays college basketball and her back is wider from playing sports all of her life. So what do you think of the size 39 or is there something closer to the 35 that I can do?
Also I love your tutorials.
Thanks
Debra
September 30, 2016 @ 10:58 pm
Hi Debra – I would probably knit a 39, it is better as a casual sweater with a little positive ease
August 7, 2016 @ 9:32 am
I knit the women size M and it shows 39″. When you block it you block 39″ or 38″ since the pattern states 1″ negative ir positive.?
Since it is not for me I can’t try it on.
Thanks in advance!
August 8, 2016 @ 10:20 am
The finished measurement will be 39″
March 16, 2016 @ 7:32 am
Could it be that there’s a mistake in the pattern? I am doing the sleeves of the antler cardigan and for the size 6-12months it says that I should begin with 30st and then increase until I have 32 st. But thats already after one set of increases, so it doesnt sound correct. Shouldnt it be 42 st?
March 16, 2016 @ 10:51 pm
Hi Lotte – nope, 32 is correct, babies arms don’t change like grown ups.
February 27, 2016 @ 10:00 am
So if I just ignore row 5 and move on, as you suggested to Christine, do I k or p any of these spaces? How do I account for the stitches?
February 29, 2016 @ 9:40 pm
Hi Sheila – no, definitely don’t ignore row 5, just the little shaded box that says ‘no stitch’
November 7, 2015 @ 10:30 pm
I am having a terrible time with the c4bdec in the Antler hat I am knitting, and I am sure I must be slipping the stitches onto my cable needle wrong or something. It is the hardest stitch I have ever tried I think, and is when I try to knit 2 tog from the cable needle. Can you help me with this?
November 11, 2015 @ 3:13 am
Take it slowly would be my first suggestion. And perhaps practice this a few times on a sample swatch?
The second suggestion (this is what I do), is instead of working the stitches directly off the cable needle, slip them BACK onto the left-hand needle, then work them off of that needle. I find this less fiddly.
Good luck! It will become easier with practice.
Project/Gift Knitting Lineup | SSK AND CO.
October 12, 2015 @ 6:52 am
[…] Is she adorable or what? Love the cardigan too! A tutorial for the pattern can be found here. This pattern which comes in adult sizes as well, is part of the book “Pacific Knits“. […]
April 18, 2015 @ 8:56 am
Thank you very much! Excellent tutorial s and explanations
March 11, 2015 @ 2:42 am
Where can inwatch video of this cardigam
March 6, 2015 @ 2:49 pm
I was hoping to copy/paste everything into my Word so I could make smaller photos to print less pages.
But the pictures don’t copy. Is there a way for me to do that for personal use only?
March 9, 2015 @ 3:32 pm
Hi Marny-sorry, we don’t have this one in PDF format quite yet but we are working on it
March 6, 2015 @ 2:32 pm
The reminder about knitting a sleeve first makes perfect sense – and as a swatch!
When taking a class for a entrelac long cardi, the teacher had us make one of the pockets first – that was our swatch.
Lily Chin would be proud of me making any sort of swatch! LOL
Thank you! Wonderful aka wonder-filled website.
Em’s Sweater Plan | Tin Can Knits
February 20, 2015 @ 8:01 am
[…] you planning to knit an Antler cardigan for yourself or a little one? We’ve got an entire in-depth tutorial here, so be sure to check it out before you cast […]
February 10, 2015 @ 8:08 am
Forgive my stupid question. I am stuck on the 5th row of chart B- decreases. what do I do on the “No Stitch” ?
February 11, 2015 @ 11:35 am
Just ignore that box and move onto the next one.
February 26, 2016 @ 6:03 am
Thanks for asking this, Marny CA. I am stumped at row 5 decreases right now. I wish that the “written” directions would be written out completely. I will give it another try.
March 17, 2014 @ 5:11 pm
So happy I Stumbled upon your blog,Lovely one at that! But the tutorial is so helpful.I am newbie at sweater not a novice.Thank you for the brillant blog
February 20, 2014 @ 10:14 am
I just finish an Antler for my granddaughter and I’m going to cast one on for my grandson. I love the sweater and the pattern is written beautifully.
I’m teaching a young friend how to knit and the tutorial would be a great help to her.
January 19, 2014 @ 2:03 pm
Thank you for your beautiful patterns. Love them.
January 16, 2014 @ 9:57 pm
Great tutorial
January 16, 2014 @ 6:21 pm
This is an awesome way to show how the bottom up pullover is done, & I love how you showed the step-by-step process especially for those sections which can be confusing like joining sleeves to body!!
January 16, 2014 @ 9:35 am
This is a fantastic tutorial! Can you tell us which yarn you used?
January 23, 2014 @ 5:48 pm
Hi Rebecca
You betcha! I eked this wee sweater out of one skein of Plucky Knitter’s Primo Worsted in ‘At the Copa’